You walk up to your rig after a week of highway miles, weather swings, fuel stops, and one too many gravel lots. The lower panels are packed with grime. The wheels are stained. Salt residue is hanging on underneath where you can’t see it without getting down on a knee. Inside, the cab has turned into the usual mix of dust, coffee drips, boot dirt, and sleeper clutter.
That’s the point where a lot of drivers settle for a quick rinse and get back on the road.
A quick rinse helps appearance. It doesn’t do much for the areas that wear out first.
Proper detailing semi truck work is maintenance. It protects paint, polished metal, rubber, the underbody, and the interior surfaces a driver touches every day. For owner-operators, that means preserving the truck that earns the check. For fleets, it means keeping assets cleaner, easier to inspect, and more presentable without dragging units out of service longer than necessary. In Nebraska, it also means dealing with a real enemy: road salt that keeps working long after winter roads look dry.
More Than a Wash The Real Value of Detailing Your Rig
A semi is never just transportation. It’s a business asset, a mobile workspace, and in many cases the first thing a customer sees before anyone says a word. When a truck stays dirty for too long, grime stops being cosmetic. It starts hiding problems.
Mud around steps and frame rails masks leaks. Salt film sits on metal longer than it should. Brake dust and road film settle into wheels and polished aluminum. Inside the cab, dust and residue build up on the surfaces a driver handles all day. None of that helps uptime.
The scale of trucking makes that reality easy to understand. Semi-trucks handle approximately 72.6% of all freight in the U.S., and the semi-truck washing industry has grown into a $12 billion sector as trucks travel a collective 329.86 billion miles annually, according to industry figures cited here. When equipment runs that hard, cleaning stops being optional appearance work and becomes part of asset care.
What a clean truck actually does for you
A proper detail helps in ways drivers and fleet managers notice fast:
- Improves inspection visibility by exposing leaks, cracked trim, loose hardware, and damaged surfaces that dirt can hide.
- Protects resale condition because paint, aluminum, and trim hold up better when contaminants aren’t left to bake on.
- Supports a safer work environment with better glass clarity, cleaner steps, and a more manageable cab.
- Keeps brand image sharp when the truck is pulling into yards, docks, customer sites, and public roads every day.
A truck that looks neglected usually has neglected areas underneath it too.
Nebraska conditions change the equation
In the Midwest, road salt makes detailing semi truck work more than a visual choice. Salt packs into undercarriages, suspension areas, wheel wells, and lower body seams. If you only wash what you can see from standing height, you miss the area that often takes the worst damage.
That’s why professional detailing starts with a different mindset. The goal isn’t to make the truck wet and shiny for a day. The goal is to clean it in the order that protects surfaces, reduces avoidable wear, and keeps the truck earning instead of sitting.
Assembling Your Professional Detailing Toolkit
A semi truck needs a kit built for height, heavy soil, mixed materials, and long work cycles. Passenger-car tools slow the job down and usually create more risk, especially around polished aluminum, lower panels caked with salt, and greasy engine or frame areas. For fleets, the right setup affects labor time, water control, and how often a truck has to come back for corrective work.
Good equipment also protects the technician. If you have to stretch for the top of a sleeper fairing, climb unstable steps, or mix chemicals by guesswork, quality drops and injury risk goes up.
Core tools that do the heavy lifting
For exterior and interior work, a professional setup usually includes:
| Product Category | Recommended Type | Key Purpose |
|---|---|---|
| Pressure washer | Heavy-duty unit with soap dispenser | Applies presoak, rinses road film, cleans lower sections and undercarriage |
| Foam application | Foam cannon | Lays down pH-neutral foam for dwell time and safer contact washing |
| Brushes | Soft-bristle extendable brushes | Reaches high cab and trailer surfaces without grinding dirt into paint |
| Water supply | DI water rinse setup | Cuts spotting on paint, glass, chrome, and polished aluminum |
| Drying tools | Forced-air blower and microfiber towels | Removes water from mirrors, seams, rivets, and trim without dragging grit |
| Wheel cleaner | Acid-free wheel cleaner | Cleans wheels with less risk to coated and polished finishes |
| General soap | pH-neutral truck wash soap | Lifts dirt while being easier on wax, trim, and coatings |
| Degreaser | Commercial-safe degreaser | Breaks down oil and heavy grime on steps, frame areas, and engine surfaces |
| Tire dressing | UV-protective dressing | Conditions rubber and finishes the truck cleanly |
| Interior vacuum | Industrial shop-vac with crevice tools | Pulls dirt from footwells, bunk edges, seat tracks, and storage corners |
| Interior chemicals | Fabric cleaner, conditioner, diluted APC | Cleans vinyl, plastics, seats, panels, and touchpoints |
| Steam or extraction | Portable steamer or extractor | Deep cleans mats, carpets, and sleeper soft surfaces |
The undercarriage and engine bay deserve their own attention in the toolkit. In Nebraska and across the Midwest, salt and road grime collect where a quick visual wash never reaches. A pressure washer with the right wand attachments, controlled degreasing tools, and access equipment for frame rails and suspension areas make a real difference in corrosion control and inspection visibility.
Chemicals are more critical than many operators realize
A harsh cleaner can make a truck look clean for one job and create expensive correction work after. I see this most often on brightwork, wheels, bug-stained front caps, and interior plastics that were hit with the wrong product because it was on hand.
A safer professional approach looks like this:
- Use pH-neutral soap on painted surfaces so protection is not stripped every wash.
- Start with acid-free wheel cleaners unless the contamination clearly calls for stronger chemistry.
- Use degreasers only where grease and oil demand it instead of treating the whole truck like an engine compartment.
- Match the chemical to the material because glass, polished aluminum, vinyl, leather, painted metal, and textured plastic all respond differently.
- Dilute for the job so you clean efficiently without leaving residue or fading surfaces.
Shop rule: The more visible and delicate the finish, the more controlled your chemistry needs to be.
Safety gear is part of the kit
Commercial truck detailing means pressure, chemical exposure, wet pavement, overhead spraying, and awkward reach points. PPE and access gear belong in the setup from the start.
A solid kit includes:
- Nitrile gloves for mixing and handling chemicals
- Eye protection for rinsing overhead panels and wheel wells
- Non-slip footwear for wet concrete, shop floors, and wash bays
- Respiratory protection when needed in enclosed engine or interior work areas
- Stable ladders or platform access equipment for upper cab sections, fairings, and trailer fronts
Skipping safety gear slows the job later. One slip, one chemical splash, or one rushed reach to the top edge of a cab can shut the whole operation down.
Water use and environmental control
Water management matters on every semi detail, especially for mobile work. The job is not just getting dirt off the truck. It is controlling runoff, preventing chemical overuse, and cleaning heavily soiled areas like undercarriages and engine bays without sending contamination across the lot.
That takes planning. Use only the water needed to break contamination loose, keep rinse water directed, and choose surface-safe products that do the job without creating disposal problems. For fleet managers, that approach protects compliance, reduces waste, and keeps wash operations practical even during tight schedules.
In salt-heavy Nebraska conditions, this matters even more. A truck can look clean from ten feet away while the frame, suspension pockets, and lower seams still hold corrosive residue. The right toolkit lets you clean those hidden areas thoroughly while keeping the process safer for technicians and more manageable for the site.
The Complete Exterior Detailing Process
A semi should not be washed like a pickup. The vehicle is taller, longer, dirtier in the lower third, and more likely to show streaking, spotting, and scratching if the order is wrong. The method that works is simple: attack the heaviest contamination first, control runoff, and avoid dragging grit across the paint.
Professional detailers follow a bottom-up methodology with heavy-duty presoak, foam cannon snow foam, and soft-bristle agitation. When done correctly, that process can extend the paint life of a semi by 2-3 years compared to untreated trucks, based on commercial truck detailing guidance here.
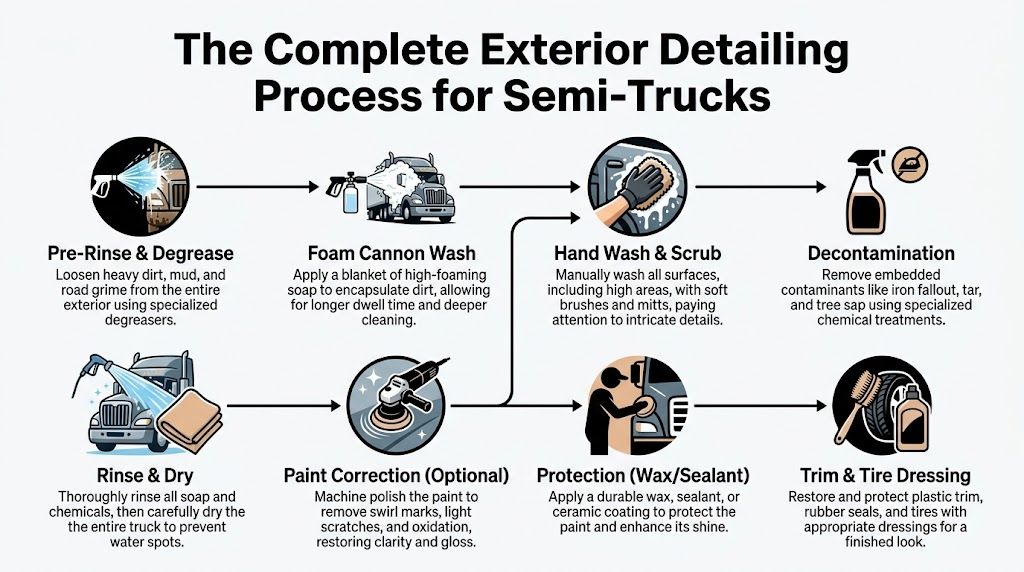
Start where the filth is worst
The dirtiest parts of the truck are usually the lower panels, wheels, underbody edges, and rear areas that catch road spray. Hit those first with a heavy-duty presoak through a pressure washer. Let the product dwell long enough to loosen road grime, salt, mud, and film, but never let it dry on the surface.
Then rinse strategically. Don’t blast random sections just because they’re in front of you. Work in a repeatable pattern so you know what’s been treated and what hasn’t.
A good exterior workflow starts like this:
- Pre-rinse lower sections and wheel areas to knock off loose contamination.
- Apply presoak bottom-up so coverage stays even and runoff doesn’t skip dirty areas.
- Rinse the treated zones before moving to foam.
Foam isn’t for show
Foam cannon soap helps because it gives the cleaner time to cling and soften what’s left after the presoak. On a semi, that matters. Flat trailer sides, bug-packed front caps, mirrors, stacks, and cab backs all hold contamination differently.
Use a pH-neutral snow foam and cover the truck thoroughly. Then agitate with soft-bristle brushes and wash media designed for commercial surfaces. Long-reach brushes help on tall cabs, but pressure matters more than reach. Let the tool do the work. Grinding dirt into a panel with a stiff brush is how a truck ends up looking older than it is.
The wash order protects the finish. The soap alone doesn’t.
Contact wash without creating scratches
Amateurs often ruin the finish, using one mitt or one brush for everything, starting high, then dragging lower-panel grit across cleaner paint.
A better system separates jobs:
- Wheel tools stay on wheels only
- Lower-body brushes stay on lower-body areas
- Paint-safe mitts or brushes stay on painted upper sections
- Microfiber drying towels never touch greasy sections
If the truck has embedded contamination like tar, sap, or fallout, use a dedicated decontamination step after the wash and before any protective product. That’s also the point where you decide whether the paint needs polishing or if a maintenance wash is enough.
Rinse clean, dry fast, protect before it spots
Final rinsing needs to be thorough. Soap residue left around rivets, seams, mirrors, fuel doors, and trim edges keeps attracting dirt and can create streaking later.
For drying, forced air is useful around mirrors, grilles, lug recesses, emblems, and panel seams. Follow with microfiber towels where needed. Don’t let hard water sit and bake on large panels if the truck is outside.
Then apply protection. For routine service, spray wax works well as a drying aid and adds gloss. Finish the tires with a UV-protective dressing so the truck leaves looking complete, not half-done.
What doesn’t work
Some shortcuts almost always cost more later:
- Top-down washing from the start because grime runs over areas you haven’t cleaned yet
- Household soap because residue and surface compatibility become problems
- One-brush-for-everything washing because that’s how paint and polished trim get marred
- Air drying only in the sun because spots set quickly on a large vehicle
A clean exterior should look even from front bumper to trailer edge. No chalky streaks, no missed lower panels, no grime hanging behind steps, and no soapy residue drying in seams.
Advanced Techniques for Wheels Undercarriage and Engine
A semi can look sharp from ten feet away and still be carrying the kind of grime that shortens component life underneath. Wheels, undercarriage, and engine bay work separate cosmetic washing from actual detailing, especially for fleets running through Nebraska winters where road salt stays active long after the panels are dry.
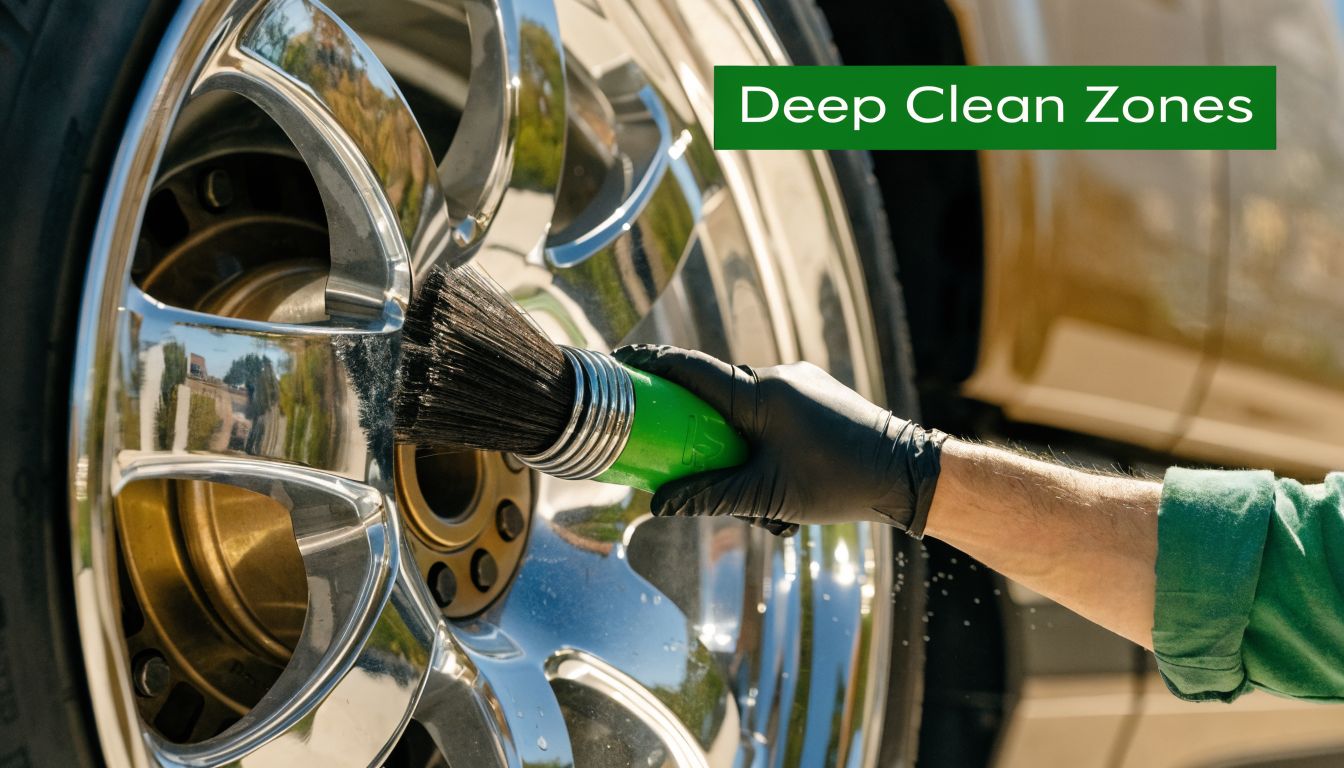
Wheels and polished aluminum need a lighter hand
Wheel cleaning starts with identifying the material. Painted steel, raw aluminum, polished aluminum, chrome, and coated surfaces do not tolerate the same chemistry. Using a strong acid on polished aluminum might save a few minutes up front, but it can leave haze or etching that takes far longer to correct than the original cleaning would have.
That trade-off matters for owner-operators and fleet managers alike. A truck that shows corrosion around wheels, tanks, or steps sends a poor signal to customers and usually points to rushed maintenance elsewhere.
A professional process looks like this:
- Rinse first to knock off grit before any brush touches the surface
- Match the cleaner to the finish instead of choosing based only on how dirty it looks
- Use separate, soft tools for lug recesses, wheel faces, and polished metal
- Flush seams and hardware thoroughly so cleaner does not sit behind caps or fasteners
- Dry the area fully before applying metal polish or tire dressing
On polished aluminum, less aggression usually gets the better result. I would rather make a second pass with safe chemistry than explain why a set of wheels now needs correction work.
Undercarriage work matters in Nebraska
Midwest trucks collect contamination where drivers rarely see it during a quick walkaround. Salt brine, mud, diesel film, and packed debris build up on frame rails, suspension parts, crossmembers, brake backing areas, mud flap brackets, and behind the steps. If that buildup stays in place, moisture stays with it, and corrosion keeps working.
That is why underbody cleaning has to be deliberate. A Gramag article discussing the gap in underbody care points out how often this area gets skipped in regular truck washing, and that matches what we see in the field on working semis across Nebraska.
A sound undercarriage process usually includes:
- Pre-flushing caked debris before applying any product
- Working the frame, wheel wells, suspension, and lower structure with controlled pressure
- Using degreaser only where oily buildup needs it
- Rinsing until the runoff clears from hidden areas, not just exposed surfaces
- Applying protection suited to the truck’s use cycle if the surface is clean and dry enough to accept it
This area has a direct ROI impact. Cleaner undercarriages are easier to inspect, rust is easier to catch early, and technicians spend less time fighting compacted grime during service. For fleet managers, that means fewer surprises and better use of shop hours.
Engine bays should be cleaned carefully, not aggressively
Engine bay detailing is controlled cleaning, not pressure washing for appearance. Modern trucks have connectors, sensors, harnesses, and electronic modules that do not benefit from being flooded. The goal is to remove oily residue, dust, and organic debris while keeping moisture exposure under control.
Start with a cool engine. Blow out loose debris around the cowl, radiator support, hinges, and covers. Cover or avoid known sensitive components as needed. Apply degreaser to the dirtiest zones, then work it with brushes and towels instead of trying to blast everything loose with water.
For trucks with heavy buildup or for fleet accounts that need consistent results, professional engine cleaning services for vehicle compartments are usually the safer call. A measured process protects electrical components, gives mechanics a cleaner space to inspect, and avoids the comeback problems that happen after an engine bay gets soaked.
Engine bay priorities
- Clear visibility so leaks, cracked hoses, and worn belts are easier to spot
- Moisture control around wiring, connectors, and electronics
- Targeted chemical use so grease is broken down without unnecessary overspray
- Clean finishing on covers, plastics, and accessible metal without leaving slippery residue
Done right, these three areas protect appearance, support safety inspections, and reduce long-term wear in the parts of the truck that take the most abuse. Done poorly, they create exactly the kind of preventable cost that busy drivers and fleet managers are trying to avoid.
Revitalizing the Cab and Sleeper Interior
A semi interior can look acceptable at a glance and still be wearing the driver down. Dust in the vents, grime on the wheel, salt tracked into the floor, old food in storage bins, and sleeper fabric holding odor all add up fast on long Nebraska runs. For fleet managers, that is not just a housekeeping issue. It affects driver comfort, cleanliness standards, and how well the truck holds up between trade cycles.

The interior needs a set order. Start high, then work down, because dust and loosened debris always fall onto lower surfaces. Crews that skip that order usually waste time re-cleaning the floor, mats, and seats after they already finished them.
Top-down flow matters in professional detailing. According to detailing flow guidance from Chemical Guys, cleaning upper surfaces first helps prevent recontaminating finished areas. That same logic applies even more in a semi, where sleeper trim, overhead compartments, curtain tracks, and vents collect more dust than a typical passenger vehicle.
Start high and match the cleaner to the surface
Headliners are easy to damage. Aggressive scrubbing can separate adhesive, and too much liquid can leave rings or sagging. Use vacuum suction, compressed air, or a soft interior brush first. If a spot needs more attention, apply cleaner to a towel, not directly to the material, then blot lightly.
Continue down through the cab in a practical sequence:
- Sun visors, overhead shelves, and trim panels
- Dashboard, gauge hood, vents, and switch areas
- Door panels, grab handles, and armrests
- Seats, bunk cushions, mattress surfaces, and storage compartments
- Floor mats, carpet, pedals, and the floor pan
Material choice matters. Vinyl and leather need cleaners that leave the surface clean without making it slick. Fabric needs low-moisture treatment so it dries properly and does not trap odor. On dashboards and hard plastics, skip greasy dressings. Shine looks good for a minute, but glare across the windshield is a real safety problem.
Sleeper areas need more attention than drivers expect
The sleeper is where neglected detail work shows up first. Bunk corners, mattress seams, under-bunk storage, curtain tracks, cubbies, and cup holders collect fine dust, food crumbs, body oils, and moisture. In winter, drivers also bring in salt residue on boots and gear, and that grime transfers into the bunk and lower trim.
That buildup is why professional interior work takes more than a vacuum and a wipe-down. We use crevice tools, soft brushes, steam where the material allows it, and extractors when fabric is holding soil below the surface. For spills and set-in marks, this guide on how to remove stains from car interior surfaces covers the same material-specific approach that applies in a truck cab.
A clean sleeper helps the driver rest better and keeps the truck easier to live with on multi-day hauls.
A visual walkthrough helps here:
Clean touchpoints on purpose, then finish the floor last
High-contact areas need their own pass. Steering wheels, shifters, dash controls, door pulls, bunk latches, and grab points carry the most hand oils and grime. Clean them with controlled product use and avoid flooding buttons, seams, or electronic switchgear.
Floor work always comes at the end. By that point, debris from the dash, seats, and sleeper has already dropped. Pull mats, vacuum edges and seat tracks thoroughly, and treat carpet based on how dirty it is. In Midwest conditions, pay extra attention to salt residue around pedals, thresholds, and the bunk step area. If that residue stays in place, it keeps wicking moisture and leaves the cab looking dirty again sooner than it should.
Interior mistakes that create extra labor
- Cleaning lower areas first, then knocking dust and debris back onto them
- Over-wetting headliners, seats, or sleeper fabric
- Using harsh chemicals on plastic, vinyl, or clear instrument surfaces
- Leaving heavy fragrance behind in a space the driver works and sleeps in
- Ignoring storage compartments and bunk edges, where odor and debris usually remain
A properly detailed cab should feel dry, orderly, and ready for the next load. That result protects driver comfort, supports a cleaner fleet image, and saves time on the next service because the interior never gets too far gone.
Maintaining the Shine and When to Call a Professional
A deep detail resets the truck. Maintenance is what keeps that reset from disappearing after the next stretch of bad weather and highway grime. The best maintenance plan is the one a driver or fleet can stick to without turning cleaning day into a second job.
For an owner-operator, that usually means handling light upkeep between major details. For a fleet manager, it means deciding which tasks belong in-house and which ones are better outsourced so trucks stay available.
What to do between full details
A practical maintenance rhythm includes a few simple habits:
- Rinse off salt and heavy grime quickly after rough weather or dirty runs
- Clean glass and mirrors regularly because visibility drops fast when film builds up
- Empty trash and vacuum touchpoint areas often so the cab never gets out of hand
- Address spills and stains early before they set into fabric or sleeper materials
- Check lower panels and wheel areas because those sections show neglect first

DIY has limits
There’s nothing wrong with washing your own truck if you have the time, equipment, and space to do it correctly. But the trade-offs are real. A semi takes room to move around, enough water supply to rinse properly, safe access for height, and a chemical setup that won’t damage aluminum, paint, rubber, and interior surfaces.
Most DIY problems come from one of three things:
- The wrong product, especially on polished metal or interior materials.
- The wrong order, which creates extra work and scratches.
- Not enough time, which leads to skipped undercarriages, rushed drying, and missed contamination.
If you’re trying to clean one truck after a long week, or keep a whole fleet presentable while units stay on schedule, the job gets big in a hurry.
When a professional service makes better sense
Professional mobile detailing makes the most sense when downtime matters, consistency matters, or the truck needs more than a basic rinse. Fleet managers usually care about all three. So do busy drivers who’d rather spend off-hours resting than dragging hoses around a yard.
A professional service is often the smarter call when:
- Your trucks operate through Nebraska winter road salt
- You need undercarriage and wheel work done correctly
- The cab and sleeper need a real deep clean
- Brand image matters at customer-facing stops
- You want protective services beyond a wash, including options discussed in this overview of whether ceramic coating is worth it
For fleets especially, the value is less about making a truck look glossy for a day and more about keeping units cleaner, easier to inspect, and ready to roll without tying up staff on detailing work.
Frequently Asked Questions About Semi Truck Detailing
How often should a semi be detailed?
A truck that runs I-80 through slush, salt, and windblown grime in January needs a different schedule than a fair-weather regional unit in July. The right interval depends on route, parking conditions, freight type, and how hard the lower half of the truck gets hit.
For Nebraska fleets, I usually tell people to think in layers. Exterior washing may need to happen weekly or biweekly during salt season. Full detailing, including decontamination, interior work, wheel cleaning, and undercarriage attention, usually makes sense on a wider interval based on use and condition. Customer-facing trucks often need tighter standards because appearance affects inspections, driver morale, and brand image.
What’s the biggest mistake people make?
Using the wrong chemical on the wrong surface. Polished aluminum gets damaged fast by aggressive acids and harsh compounds, especially on wheels, tanks, and stacks. According to a video from Pan The Organizer, product choice and technique matter much more than many DIY guides make it seem.
The second mistake is skipping a test spot. On semi trucks, one bad product decision can stain metal, haze trim, or strip protection across a very large surface area. That gets expensive fast.
Can I use household soap or all-purpose cleaners?
You can. I would not recommend it.
Household soaps are not built for diesel soot, road film, bug residue, salt deposits, or polished truck metals. Many leave films behind or dry poorly on large panels. Inside the cab, all-purpose cleaners can also discolor plastics, dry out vinyl, or leave surfaces slick, which is the last thing you want around steps, grab points, and driver controls.
Is undercarriage cleaning really necessary?
Yes, especially in the Midwest.
Undercarriage cleaning is one of the most overlooked parts of semi truck detailing, and it has a direct effect on corrosion control. Salt and grime pack into crossmembers, suspension components, wheel wells, and hard-to-see pockets that do not get flushed by a quick wash. Fleet managers who want better service life and fewer ugly surprises during inspections should treat underbody cleaning as routine maintenance, not cosmetic work.
Should the engine bay be detailed too?
Yes, but it needs to be done with restraint.
A proper engine bay detail helps remove oil residue, dust, and packed grime that can hide leaks or worn components. The trade-off is risk. Sensitive electrical connections, sensors, and exposed areas do not respond well to careless pressure washing or over-saturation. On working trucks, the goal is a clean, inspectable engine bay, not a dripping wet showroom finish.
Should I detail the interior even if it doesn’t look that bad?
Yes. By the time a sleeper or cab looks dirty, the buildup is usually well past light maintenance.
Dust, skin oils, food residue, boot grime, and sleeper odors build slowly and then all at once. A clean interior is not just about appearance. It improves driver comfort, cuts down on lingering odors, and helps the truck feel cared for during long weeks on the road.
Is detailing semi truck work realistic as a DIY project?
Basic washing, yes. Full detailing is another matter.
Once you add ladder work, roof runoff, polished metal, wheel faces, undercarriage flushing, engine bay risk, sleeper cleaning, water recovery concerns, and the time it takes to dry a big rig correctly, the job gets heavy in a hurry. That is why many busy owner-operators and fleet managers hand the work to a professional crew. GP Mobile Car Wash & Detail handles those jobs on-site and at the shop, which helps keep trucks clean without pulling drivers too far off schedule.