You walk out on a Lincoln summer afternoon, glance at the hood, and notice the paint doesn't reflect light the way it used to. It looks flat. Maybe chalky. Maybe the roof has gone a shade lighter than the doors. If winter road film sat on the surface for months and the car spends most days outside, that damage tends to show up fast once the heat returns.
That's the point where a lot of owners waste money. They buy wax for paint that needs compounding, or they buy compound for paint that's already past correction. Sun damage car paint repair starts with diagnosis, not products.
In Nebraska, the pattern is common. Strong summer sun cooks the top surfaces. Then winter leaves grime and residue sitting on the paint until spring. The hood, roof, and trunk usually tell the story first. If the clear coat is still intact, you may be able to restore a lot of the finish yourself. If it's peeling or the primer is showing, polishing won't save it.
How to Assess Sun Damage on Your Vehicle
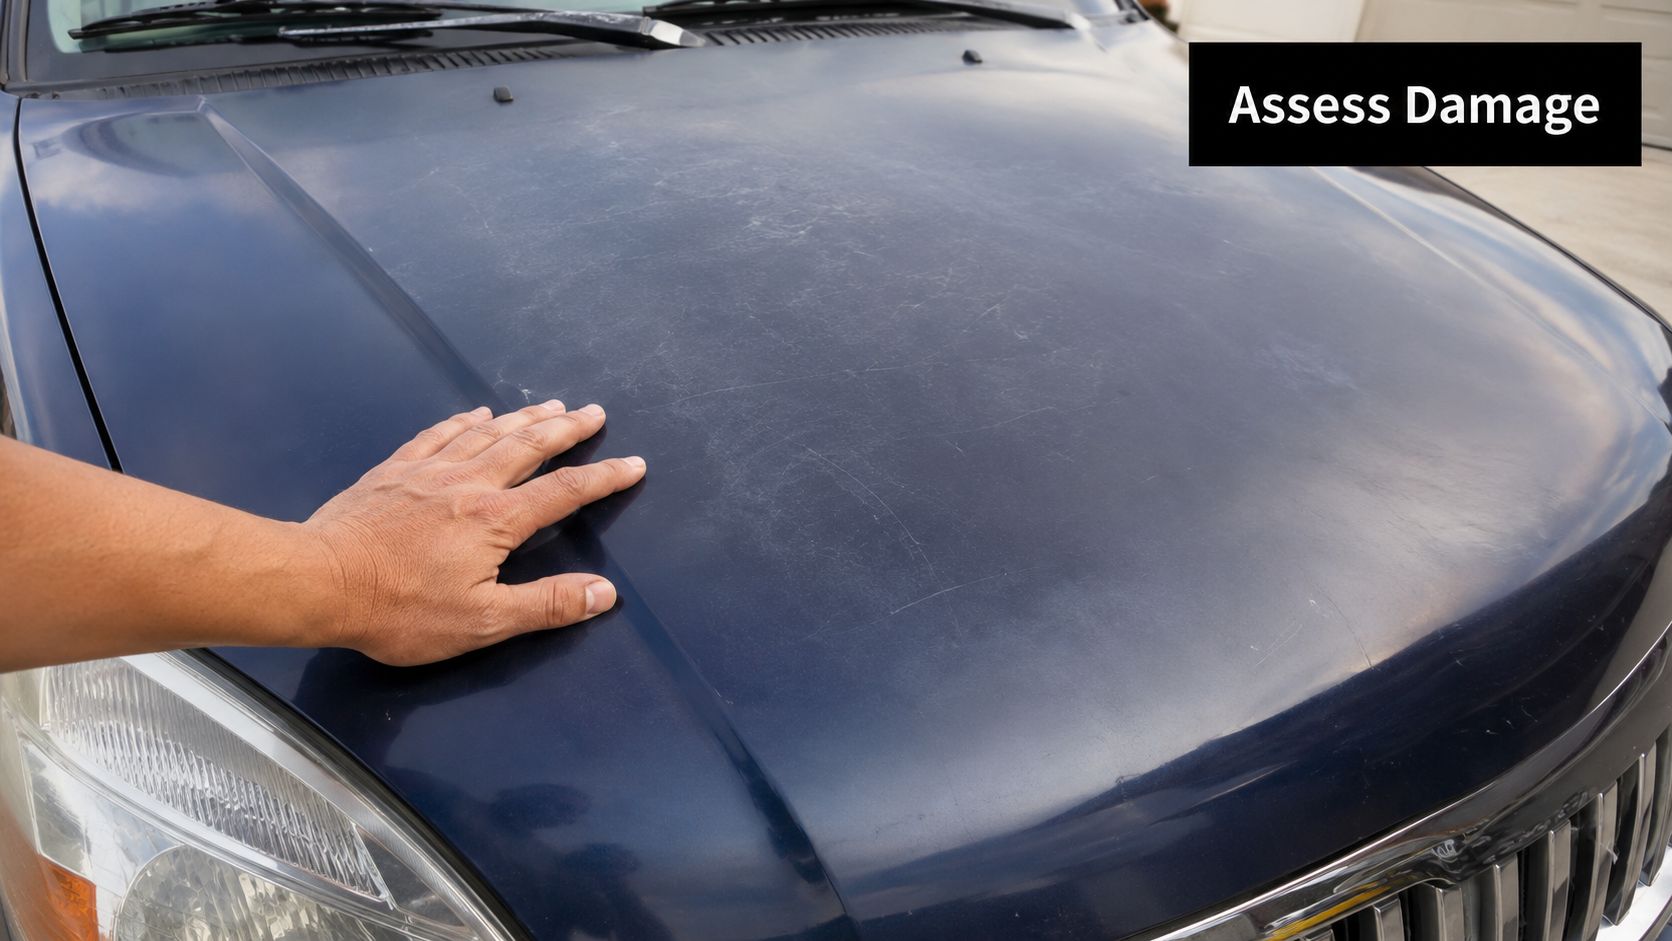
Park the car in bright daylight, then look at it from two angles. In Lincoln, I prefer late morning or early evening light because harsh noon sun can wash out what you need to see. Start with the hood and roof, since Nebraska sun cooks those panels first and winter residue tends to sit there the longest.
The first job is to figure out whether you have oxidation, clear coat failure, or a surface problem that only looks like sun damage.
The quickest hands-on check is simple. Lightly drag a clean fingernail across the worst area. If the paint feels dull but mostly flat, and your nail does not catch, you are usually dealing with oxidation. If your nail catches on rough edges, chips, or lifting material, the clear coat is failing.
What oxidation looks like
Oxidation shows up as a hazy, chalky, faded surface. Black paint starts to look gray. Red often goes pink or flat. The finish may still feel smooth in places, but the gloss and depth are gone.
That condition is often correctable if the clear coat is still present. A polish or compound can remove dead, weathered material from the top of the finish and bring back clarity. If you want a better sense of what recoverable fading looks like before you buy tools, this guide on how to restore faded car paint gives a useful visual baseline.
What clear coat failure looks like
Clear coat failure has harder edges and a more uneven pattern. You may see peeling, flaking, cloudy patches, cracking, or spots where the top layer looks like it is lifting off the panel. On older hoods and roofs, it often starts in small patches and then spreads through the hottest months.
At that stage, polishing will not rebuild missing material. It may improve the appearance for a short time, but it will not stop the failure.
Practical rule: Dull paint can often be corrected. Peeling paint needs refinishing.
Check the worst areas first
Do not judge the whole vehicle by the driver door. Side panels often look better because they take less direct UV exposure. Damage is typically more pronounced on the horizontal surfaces and the upper edges.
Inspect these areas first:
- Hood and roof: Usually the first panels to fade in Nebraska sun.
- Trunk lid and upper door frames: Common next-step damage areas.
- Body lines and panel edges: Paint is thinner here and easier to burn through during DIY correction.
- Spots around bug marks, bird droppings, and old water stains: Etching can mimic sun damage or make it look worse than it is.
If the panel looks bad, wipe a small section with a paint-safe cleaner and inspect it again. I have seen plenty of Lincoln vehicles that looked sunburned but were mostly covered in oxidation, salt residue, and baked-on grime. If a small test spot improves with light polish, DIY may make sense. If the finish is flaking, uneven, or showing color loss through the clear, save your time and get a local pro involved.
A Step-by-Step DIY Repair for Minor Paint Oxidation
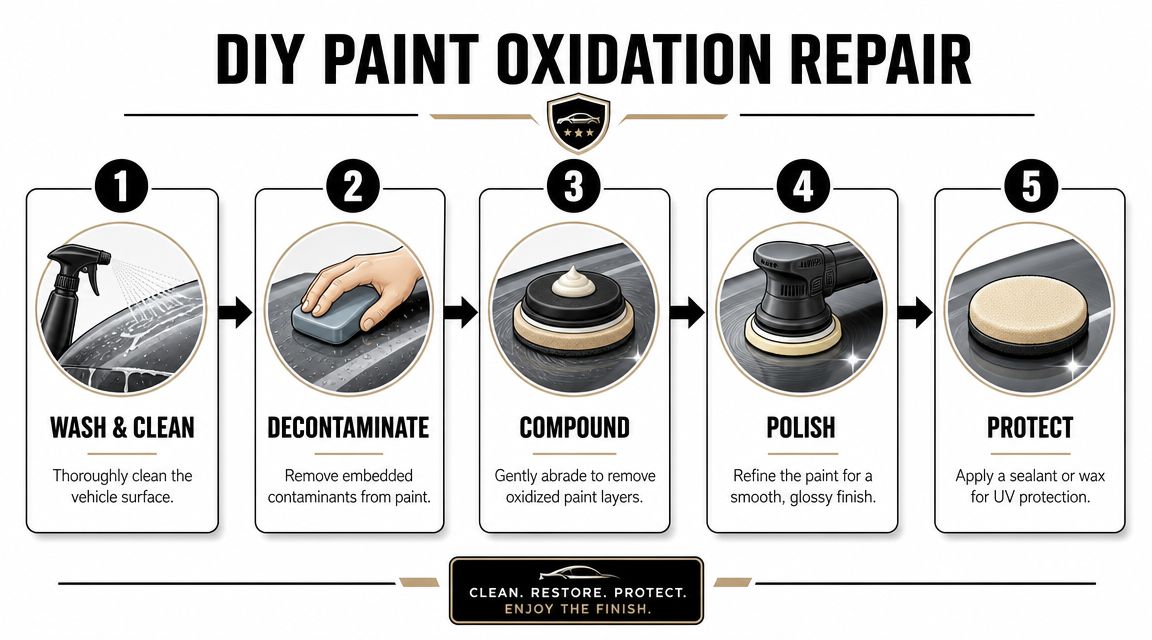
If your paint is oxidized but still intact, a DIY repair can make a real difference. The sequence matters. The proper workflow is wash → clay decontamination → compound → polish → protect, and that order matters because bonded contamination interferes with abrasive correction and can make oxidation look worse, as outlined in this guide to fixing sun damage on cars. That same guide notes DIY compound and polish supplies often run about $30-$80.
Start with the surface completely clean. Don't skip ahead to compound because the paint looks bad. Dirt, road film, and leftover winter contamination can load up your pad and put extra marring into the finish.
Build a clean surface first
Wash the car thoroughly and dry it well. If you have shade, use it. Hot panels make compounds and polishes harder to control, which matters in Nebraska summer heat.
Then clay the paint. A clay bar or clay mitt removes bonded contamination that washing leaves behind. If the paint feels gritty when you slide your fingertips over it, it's not ready for polishing yet.
A useful walk-through on restoring faded finishes is this faded car paint restoration article, especially if you're trying to decide whether your paint still has enough material left for correction.
Correct the oxidation in small sections
Use a rubbing compound on a small 2×2 foot section at a time. A dual-action polisher gives more even results than hand application, especially on hoods and roofs where the damage tends to be broad and uniform. Work overlapping passes, keep the pad moving, and inspect after each section.
If the panel improves quickly, that's a good sign. If the pad loads up fast and the finish still looks blotchy, stop and reassess.
Don't chase perfection on the first pass. Chase a stable, improved surface.
One of the biggest DIY mistakes is leaning too hard on the machine or staying too long on edges and body lines. Those areas can cut through faster than flat panels. Keep your pressure controlled and reduce aggression near sharp contours.
After compounding, switch to a finishing polish. This step clears up haze and micro-marring left behind by the compound. It's what brings back the clarity that makes the panel look alive again instead of just “less bad.”
Here's a video that shows the overall process in action:
Lock in the result
Corrected paint without protection won't stay corrected for long. Once you've polished the section and wiped it clean, apply protection.
You have a few practical options:
- Wax: Good if you want quick gloss and simple application.
- Sealant: A stronger choice for drivers who park outside often.
- Ceramic coating: Better suited for owners who want longer-term protection after correction.
If the oxidation is deeper, some vehicles need a more aggressive compound step and, in some cases, wet sanding. That's the point where DIY risk rises fast. On older or thinner paint, it's easy to go from “improving” to “burning through.”
Choosing Your Path DIY vs Professional Repair Costs
A common Lincoln scenario goes like this. The hood looks chalky after a summer in full sun, the roof has lost gloss, and winter road film has left the paint feeling rough. At that point, the key question is not just cost. It is whether the paint still has enough healthy clear coat left to correct safely.
For minor oxidation, DIY is usually a materials purchase plus your time. Professional correction costs more because you are paying for paint thickness checks, machine control, better lighting, and the judgment to stop before a thin panel turns into a repaint. On Nebraska vehicles that live outside year-round, that judgment matters.
DIY vs Professional Sun Damage Repair
| Factor | DIY Repair | Professional Repair (e.g., GP Mobile) |
|---|---|---|
| Best fit | Light oxidation, fading, or dullness with intact clear coat | Moderate to heavy oxidation, uneven panel condition, or damage that needs experienced evaluation |
| Up-front cost | Lower cash outlay, but you still need polish, pads, towels, and protection | Higher service cost, but equipment, products, and labor are included |
| Time | Several hours once you include washing, decontamination, test spots, correction, and cleanup | Less owner time. The vehicle is handled by someone who does this work regularly |
| Risk | Higher if you have never used a machine polisher or if the paint is already thin | Lower correction risk because the process is controlled and the paint is evaluated first |
| Result expectation | Good improvement if the damage is mild and you stay conservative | More consistent finish, especially on hoods, roofs, and darker colors that show haze easily |
| Protection after repair | You choose and apply your own protection | A pro can correct the paint and set it up with a longer-term option such as ceramic coating for vehicle protection |
How to decide
DIY makes sense if you can answer yes to three questions. Is the clear coat still intact? Is the damage mostly surface oxidation and lost gloss? Are you willing to stop after a test spot if the panel does not improve enough?
That last part matters more than car owners expect.
I see people in Lincoln get into trouble when they treat every faded panel like it just needs more compound. On older vehicles, especially ones that have baked through July and August and then sat through salty winter roads, the hood and roof often age faster than the doors and quarter panels. One panel may correct well. The next may be too far gone for safe polishing.
Professional correction makes more sense when the finish is uneven from panel to panel, the vehicle is dark colored, or the car matters enough that a mediocre result will bother you every day. It also makes sense if you do not own the tools already. Buying a machine, pads, compounds, towels, and protection can narrow the savings fast, especially for a one-time job.
Use this rule of thumb. If a small test spot gets noticeably clearer with controlled polishing, DIY is still on the table. If the spot stays blotchy, feels rough after decontamination, or shows signs that the top layer is failing, stop there and have a local pro evaluate it.
That approach saves money better than pushing ahead and creating a bigger repair bill.
When Professional Paint Correction Is the Only Answer
When the clear coat is peeling, you're no longer doing detailing work. You're doing refinishing work. That distinction matters because the tools, materials, and end goal change completely.
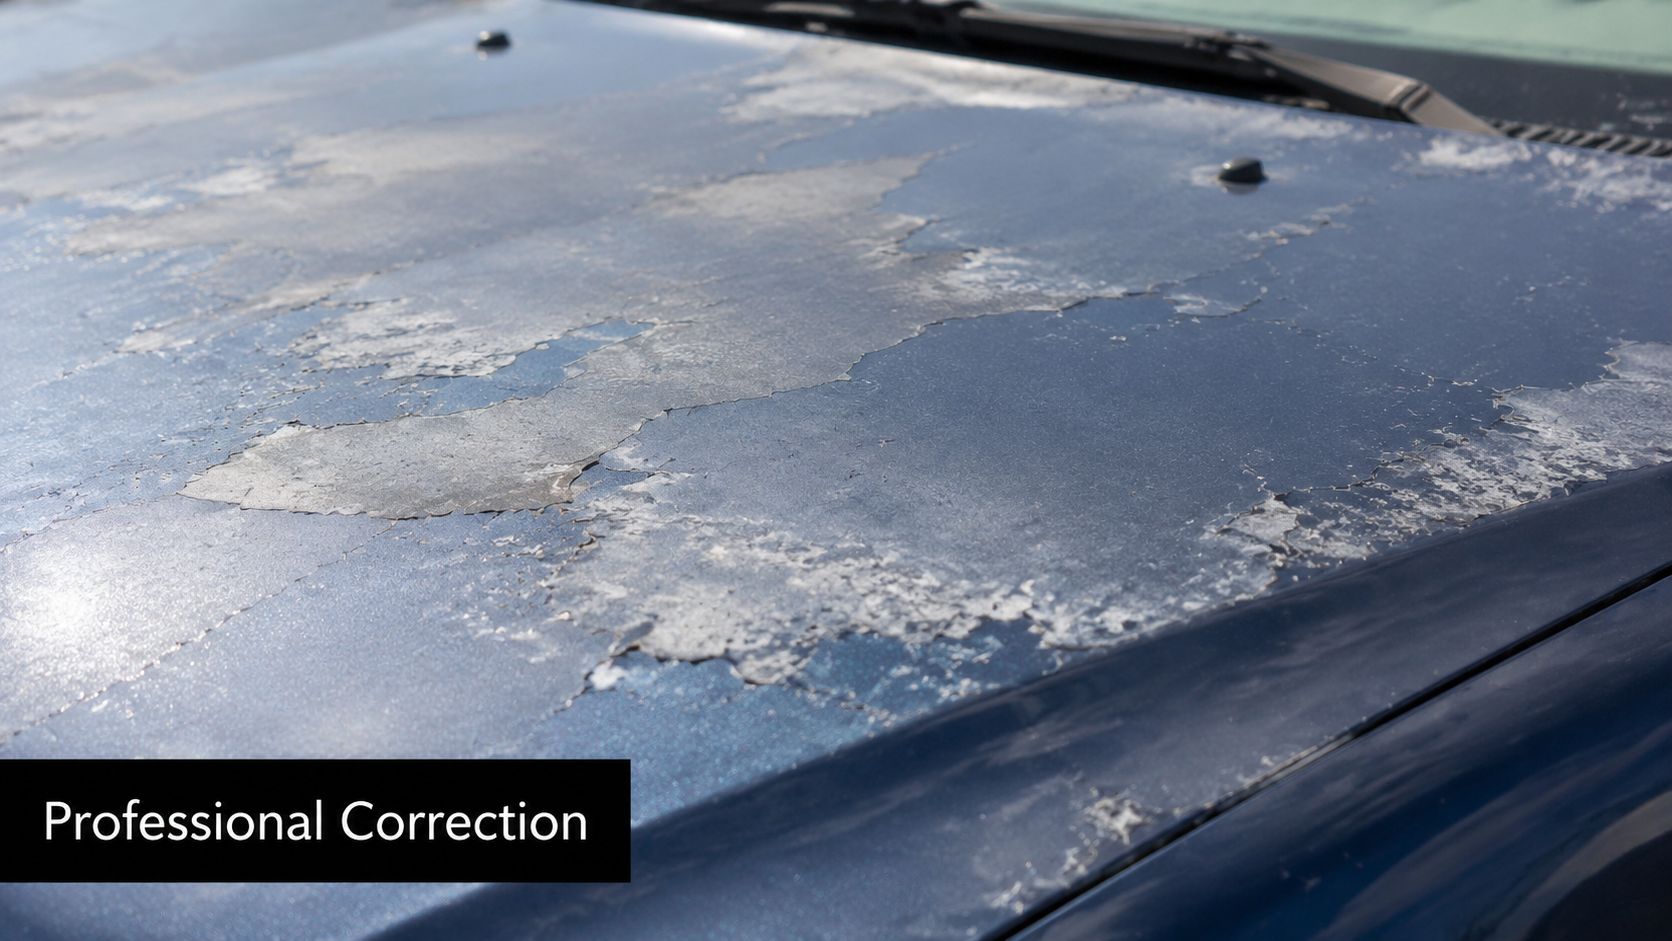
A failed clear coat can look temporarily better after compound, but that improvement doesn't last. The damaged layer is already breaking apart. According to this clear coat failure repair guide, once sun damage reaches peeling clear coat, the process shifts to refinishing: sand the damaged area, feather the transition, prime, color-coat, and re-clear. That guide specifies 1500-grit wet sanding to remove peeling clear coat and then 2-3 thin coats of new clear coat for UV protection.
What a pro is actually correcting
There are two very different jobs people lump together:
- Paint correction: Removing or reducing defects in salvageable paint through compounding and polishing.
- Refinishing: Rebuilding a failed paint system through sanding, priming, painting, and clear coat application.
If your paint still has an intact surface, correction may help. If the top layer is lifting, cracking, or exposing what's underneath, the surface has to be rebuilt.
For owners comparing service options, this overview of paint correction on a car helps clarify what correction is meant to solve and what it isn't.
What doesn't work
A few things waste time at this stage:
- Heavy polishing on peeling clear coat: It might darken the area briefly, but it won't restore structure.
- Wax over failed clear coat: It adds shine, not repair.
- Spot compounding around loose edges: That often makes the transition more obvious.
Polishing failed clear coat is a cosmetic delay, not a fix.
A local detailer or body shop can tell you pretty quickly whether a panel is still correctable or whether it needs refinishing. That's worth hearing before you spend money on pads, compounds, and hours of labor that won't change the outcome.
Long-Term Paint Protection for the Nebraska Climate
A lot of Lincoln vehicles look fine in spring, then rough by late August. The hood starts to dull, the roof loses gloss, and by winter the lower panels are carrying road film and treatment residue. Nebraska puts paint through both extremes in one year, so protection has to do more than add shine.
After repair, prevention is the least expensive part of the job. It also decides how long that repair holds up.
Shaded parking does more for paint than any bottle on a shelf. If a garage or covered spot is available, use it. For vehicles that live outside, regular washing and a real protection layer are the next best tools. Owners comparing products should know where ceramic fits in. As explained in this vehicle paint protection article, ceramic coatings are sold as a longer-term option because they bond to the paint and last longer than traditional wax.
Effective strategies for this climate
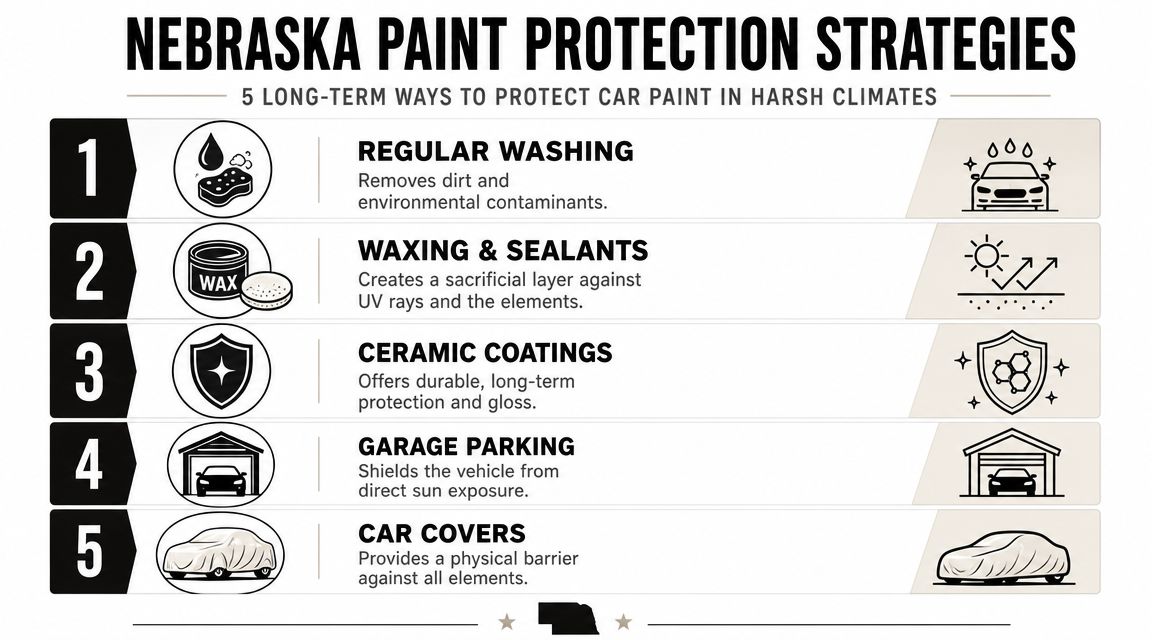
- Regular washing: The importance of regular washing is often underestimated. Bug residue in summer, bird droppings, tree sap, and winter road grime all sit on the surface and wear it down faster.
- Garage parking when possible: Less UV exposure means less stress on the clear coat, especially on the hood, roof, and trunk.
- Wax or sealant: This is a practical choice for owners who will reapply it on schedule and keep up with washing.
- Ceramic coating after correction or refinishing: This makes sense for drivers who want longer-lasting protection and easier cleanup, especially if the vehicle stays outside.
- Car cover for stored vehicles: Helpful for cars that sit for weeks at a time. For daily drivers, covers are often more hassle than benefit unless the fit is very good and the paint is clean before covering.
The right choice depends on how the vehicle is used. A garaged weekend car can do well with routine washing and a quality sealant. A daily driver parked outside in Lincoln sun usually benefits from stronger protection and more frequent decontamination, especially after winter road treatments.
Once the finish has been corrected or refinished, keep the maintenance simple and consistent. Wash it before contaminants bake in. Keep a protection layer on the surface. Check the horizontal panels at the end of summer and the lower body after winter. That routine gives owners the best chance of keeping sun damage from coming right back.
If your vehicle's paint is faded, chalky, or starting to fail, GP Mobile Car Wash & Detail offers mobile service in Lincoln and surrounding areas, plus drop-off service at their Fremont Street shop. For owners who want help deciding whether the finish needs correction, protection, or a referral for refinishing, they're one local option to evaluate.