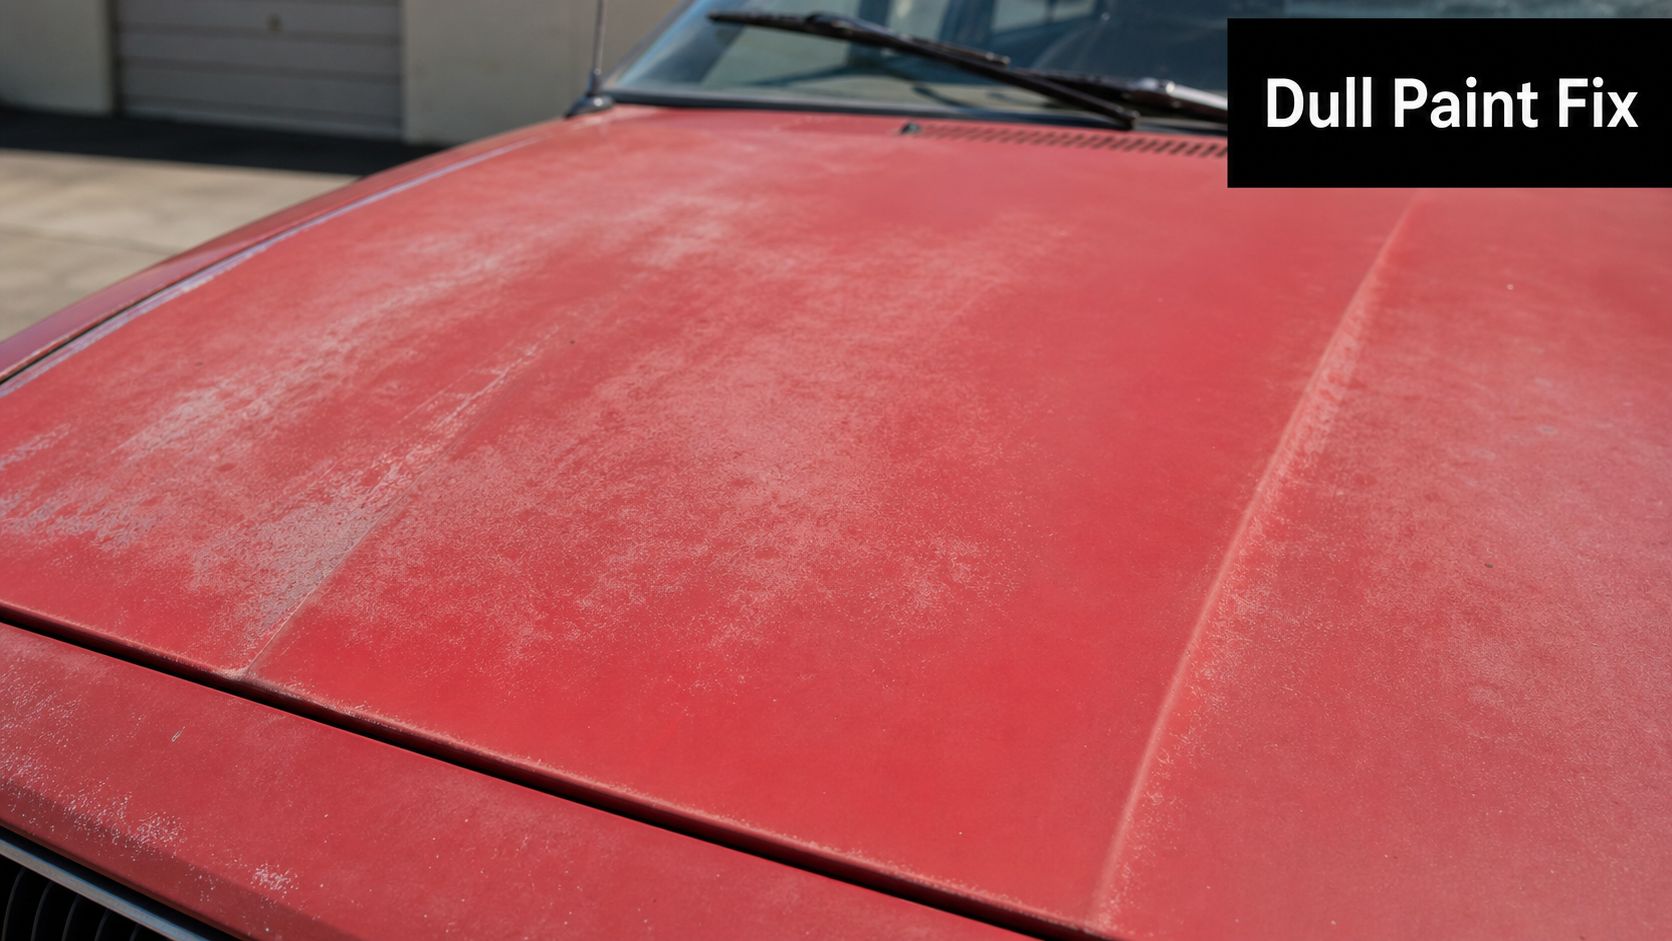
You walk out to your car, catch the hood in the sunlight, and there it is. The paint looks flat, chalky, maybe a little faded on the roof and trunk too. It still runs fine, but it doesn't look cared for anymore.
That's usually the moment people start searching for how to remove oxidation from paint. And the honest answer is that some oxidized paint can be corrected at home, while some of it is already past the point where polishing will help. Knowing the difference is the part most DIY guides skip.
Around Lincoln, I see both situations all the time. Some vehicles just need a careful correction and protection plan. Others have clear coat failure or deeper damage, and continuing to polish them only makes the problem worse. If you can diagnose that first, you'll save yourself time, money, and a lot of frustration.
What Is Paint Oxidation and Why It Happens
Paint oxidation usually shows up as a dull, faded, or chalky look on the surfaces that take the most sun and weather. Hoods, roofs, and trunks are common trouble spots. Dark colors and reds tend to make it more obvious, but any color can oxidize.
What's actually happening
On most modern vehicles, the clear coat is the sacrificial top layer. Sun exposure, air, heat, and environmental contamination gradually break that layer down. The surface loses gloss first. Then it starts looking hazy. Left alone long enough, it can become chalky and uneven.
That's why oxidation isn't just a cosmetic issue. It's a warning sign that the protective outer layer is failing.
If the damage is still limited to the upper part of the clear coat, correction can work very well. If the clear coat has already failed and the problem has reached the color coat, primer, or bare metal, polishing won't fix it. At that point, repainting becomes the proper solution.
Why early action matters
Light oxidation is much easier to deal with than neglected oxidation. When the finish still has structure left, a proper polishing process can restore clarity and gloss. Wait too long, and your options narrow fast.
A lot of owners first notice oxidation after a stretch of hard sun exposure or after the vehicle starts living outside full time. If you want to slow that process down after correction, this guide on protecting car paint from sun damage is worth reading.
Practical rule: If the paint still looks dull but intact, correction may help. If it's peeling, flaking, or exposing lower layers, stop thinking polish and start thinking repair.
What works and what doesn't
A wash alone won't remove oxidation. Neither will a quick spray wax or an all-in-one cleaner if the paint is heavily chalked. Oxidation removal is a mechanical correction job, which means carefully abrading damaged material off the surface and refining what remains.
That sounds aggressive, but done correctly, it's controlled work. Done carelessly, it can thin the clear coat more than necessary. The biggest skill isn't using the machine. It's diagnosing the paint before you start.
Assess the Severity and Gather Your Supplies
Before you buy pads, compounds, or a machine, inspect the paint. This is the fork in the road. One path leads to a satisfying weekend project. The other leads to wasted effort and a finish that looks worse than when you started.
What to look for by eye and by touch
Start with a clean, dry vehicle in good light. Walk around it slowly and check the horizontal panels first.
Light oxidation usually looks like lost gloss. The paint appears muted or slightly hazy, but it still feels mostly smooth.
Moderate oxidation is easier to spot. The color looks faded, the surface may feel dry or chalky, and you may see residue transfer to your towel when you wipe the panel.
Heavy oxidation often looks uneven and tired even from a distance. If you also see peeling, cracking, or obvious layer failure, treat that as a stop sign rather than a challenge.
Use a simple decision mindset
A few practical checks help:
- Check the shine response: Rub a small hidden spot by hand with a mild polish. If the area brightens, the paint may be correctable.
- Check the surface pattern: Uniform dullness is usually more promising than random peeling.
- Check for edge damage: Raised edges, flaking clear, or rough transitions usually mean the coating has failed.
- Check your expectations: If you want perfection on badly damaged paint, DIY correction may disappoint even when it helps.
If your test area improves, keep going carefully. If it stays dead-looking after repeated careful attempts, don't keep escalating forever.
Oxidation Level Diagnosis & Toolkit
| Level | Visual Cues | Recommended Product | Required Tools |
|---|---|---|---|
| Light | Mild haze, reduced gloss, mostly smooth finish | Light polish or finishing polish | Microfiber towels, applicator pad or DA polisher, finishing pad |
| Moderate | Faded color, chalky feel, dull reflection | Cutting compound followed by polish | Dual-action polisher, cutting pad, finishing pad, microfiber towels |
| Heavy | Thick oxidation, severe fading, uneven finish, possible coating failure | Test spot first, then compound and polish only if the paint responds | Dual-action polisher, cutting pad, finishing pad, inspection light, microfiber towels |
Supplies worth having before you start
Don't piece this together halfway through the job. Have everything ready.
- Wash supplies: pH-safe car shampoo, two buckets, wash mitt, drying towels.
- Decontamination tools: iron remover, clay bar or clay mitt, clay lubricant.
- Correction setup: DA polisher, cutting pad, finishing pad, cutting compound, polish.
- Inspection and cleanup: good lighting, microfiber towels, diluted isopropyl alcohol solution for final wipe-down.
- Protection product: wax, sealant, or coating, depending on how far you want to go.
If you're staring at a large oxidized vehicle like a camper or RV, it may also make sense to compare your DIY plan with a service that already handles that type of correction work, such as oxidation removal from larger painted surfaces.
The Step-by-Step Paint Correction Method
You wash the car, pull it into the light, and the hood still looks dead. Before you start polishing, make sure you already confirmed the paint can respond. If the clear coat is oxidized, correction can bring back gloss. If the color coat is failing or the clear is gone, no compound is going to fix that, and pushing harder usually makes the panel look worse.
Wash the vehicle thoroughly
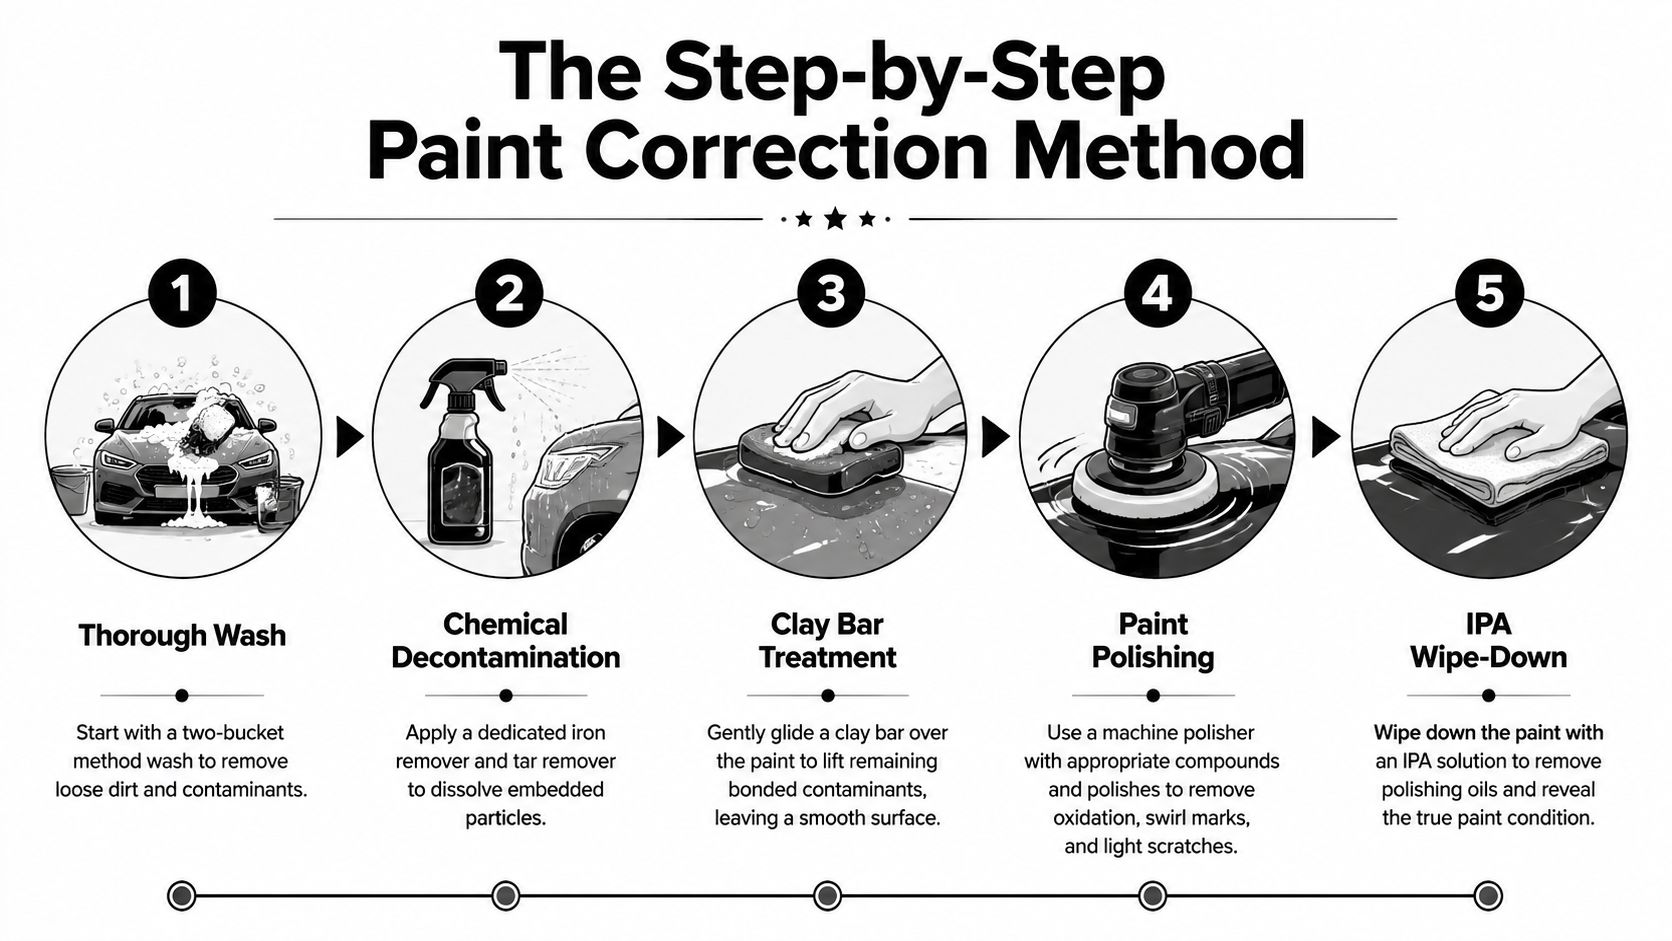
Start with a proper wash so you are working on paint, not dirt. Use the two-bucket method, rinse well, and clean the areas that trap grime, especially around emblems, trim edges, and lower panels.
Dry it completely. Water hiding behind mirrors, badges, and panel gaps will drip onto the surface later and mess with your polishing cycle.
Decontaminate before you polish
Oxidized paint often stays rough after washing. That rough feel is usually bonded contamination sitting on top of the damaged surface, and polishing over it can create extra marring.
Use iron remover first, then tar remover if needed. After that, clay the paint until it feels smooth to the touch. A clean surface lets your pad stay in better contact with the paint and gives you a more honest test spot.
Here's a useful visual overview before you start polishing:
Test a small hidden area first
This is the step DIYers skip most often, and it is the one that tells you whether you are correcting oxidation or chasing failure. LM Car Detailing's oxidation removal guide points out that results change with paint type, hardness, and technique. That matches what we see in the shop. Two vehicles with similar fading can react very differently once the machine touches the panel.
Pick a small, less-visible section and start with the mildest combo that has a realistic chance of cutting the oxidation. If the spot clears up and gains gloss, keep going. If it stays blotchy, keeps absorbing product, or shows no improvement after a reasonable test, stop and reassess. That usually means the problem is deeper than surface oxidation.
Correct the oxidation in small sections
Once the test spot works, repeat that process panel by panel. For moderate oxidation, that usually means a cutting compound with a cutting pad first, followed by a finishing polish with a softer pad.
Work in sections about 2 feet by 2 feet. That size gives you control over heat, pad movement, and residue, and it makes it easier to catch trouble early. Large sections look faster, but they usually lead to uneven correction and missed spots.
For a DA polisher, keep the process controlled:
- Spread the compound at a low speed first.
- Increase speed for the correction passes.
- Use slow, overlapping passes with steady pressure.
- Finish with a lighter pass before wiping off residue.
Keep the pad flat against the paint. Clean the pad often. If the pad gets clogged with spent product and oxidized residue, cut quality drops fast and the finish can haze.
Finish the paint properly
After compounding, switch to a finishing pad and polish the panel to bring back clarity. This is the step that separates "better" from "corrected," especially on black, navy, and other dark colors that show haze right away.
Then wipe the panel with an isopropyl alcohol solution diluted to about 10 to 20 percent. That removes polish oils and shows the finish underneath. Without that wipe-down, fillers can hide leftover oxidation or haze for a few minutes, then the dullness comes right back in the sun.
If you want a broader look at what the full process involves, this guide to paint correction on a car gives a helpful overview.
What usually goes wrong
Most failed DIY oxidation jobs trace back to a few avoidable mistakes:
- Skipping the test spot
- Polishing contaminated paint
- Starting too aggressive
- Working too large an area at once
- Mistaking polish oils for real correction
If your test spot improves and the finish keeps getting clearer with each step, a careful DIY job can work well. If the paint stays chalky, patchy, or thin, that is usually the point where professional correction or repainting makes more sense than pushing your luck.
Applying Long-Term Paint Protection
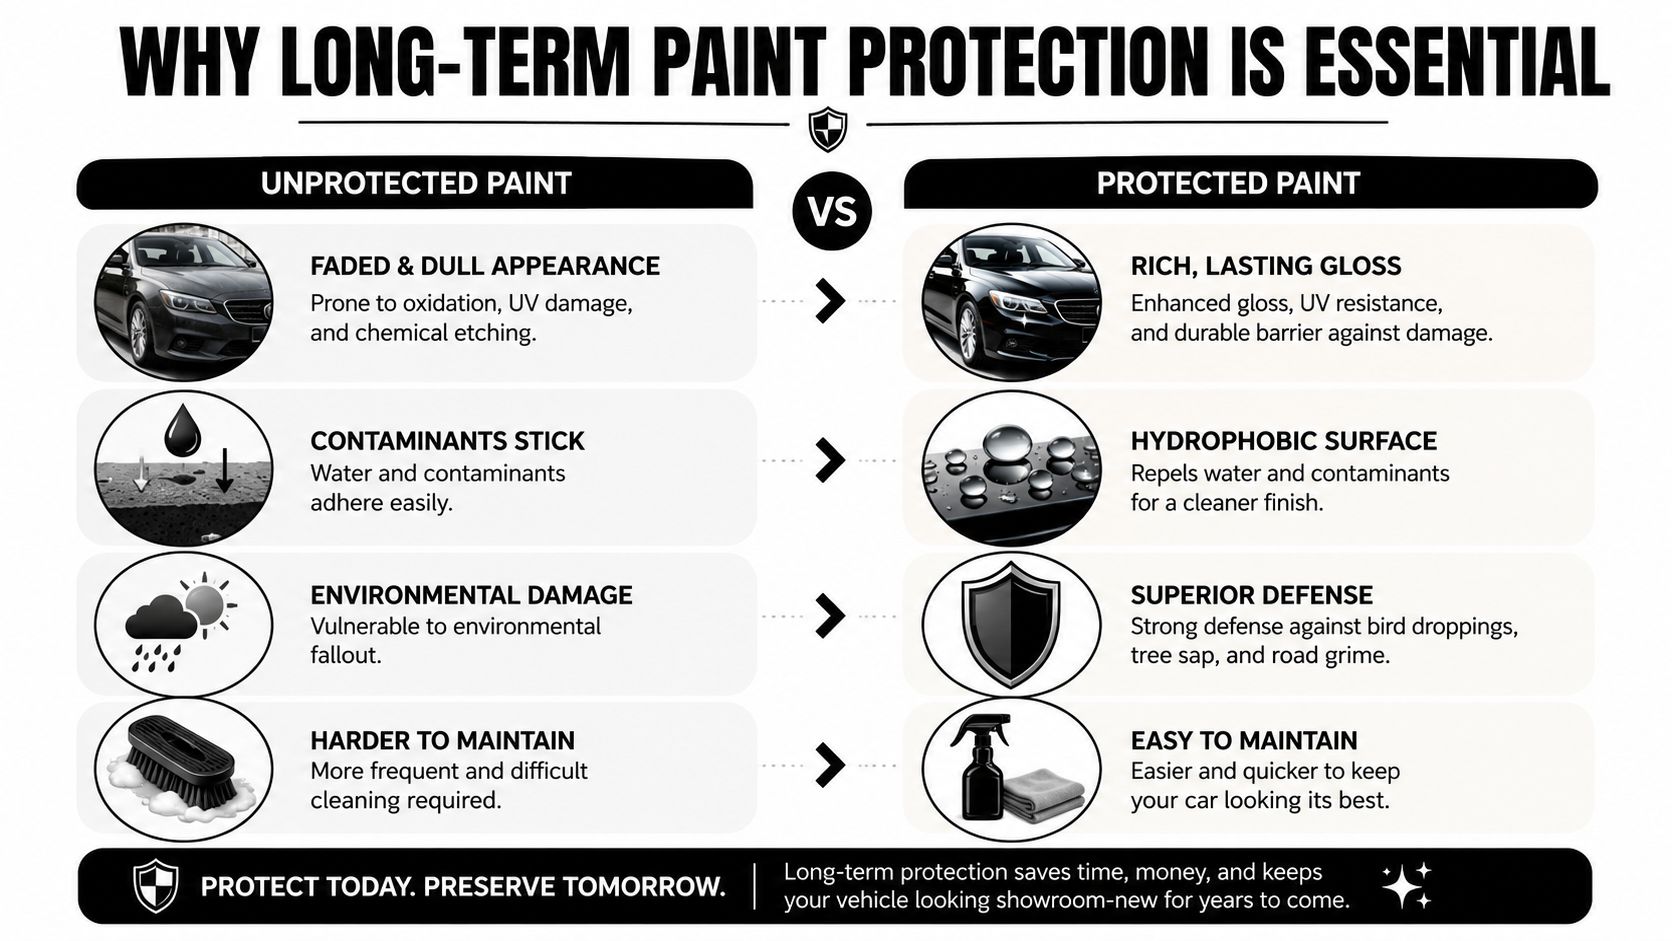
Once you've corrected oxidized paint, the surface is clean, exposed, and vulnerable. Leaving it bare is a bad move. You just removed damaged material and revealed healthier paint underneath. Now you need to protect it.
Wax, sealant, or ceramic coating
Each option works. They just serve different owners.
| Protection Type | What It's Like | Application Effort | Durability Approach |
|---|---|---|---|
| Carnauba wax | Warm glow and classic look | Usually the easiest | Shorter-term protection that needs regular reapplication |
| Synthetic sealant | Sharper shine and stronger environmental resistance | Moderate | Better fit for people who want longer intervals between applications |
| Ceramic coating | Harder-wearing protective layer with strong water behavior and easier maintenance | Highest prep demands | Long-term solution when installed correctly |
Wax is fine if you enjoy frequent upkeep. Sealants make sense for daily drivers that need a practical barrier. Ceramic coatings are the route most owners choose when they want correction work to stay looking good with less day-to-day struggle.
Why protection isn't optional
Corrected paint without protection starts degrading again the moment it goes back into the sun and weather. Protection buys you time, makes washing easier, and helps preserve the appearance you worked for.
Freshly corrected paint looks great. Protected paint stays that way far longer and cleans up with less effort.
For people comparing options for a newer or freshly restored vehicle, this guide to the best paint protection for a new car lays out the differences clearly.
When a pro install makes sense
A ceramic coating can be a smart choice, but it also demands proper prep. Any polishing haze, missed oxidation, or leftover residue gets locked under the coating. That's why some owners do the correction themselves and then hand off the final prep and coating to a shop.
One local option is GP Mobile Car Wash & Detail, which offers ceramic coating as one of several paint protection services. That kind of service fits owners who want the paint corrected and then sealed with a more durable layer without guessing through the final application steps.
When the Paint Is Beyond DIY Repair
This is the part more people need to hear. Not every oxidized finish should be polished. Some paint is already past correction, and trying harder won't save it.
The line between fixable and failed
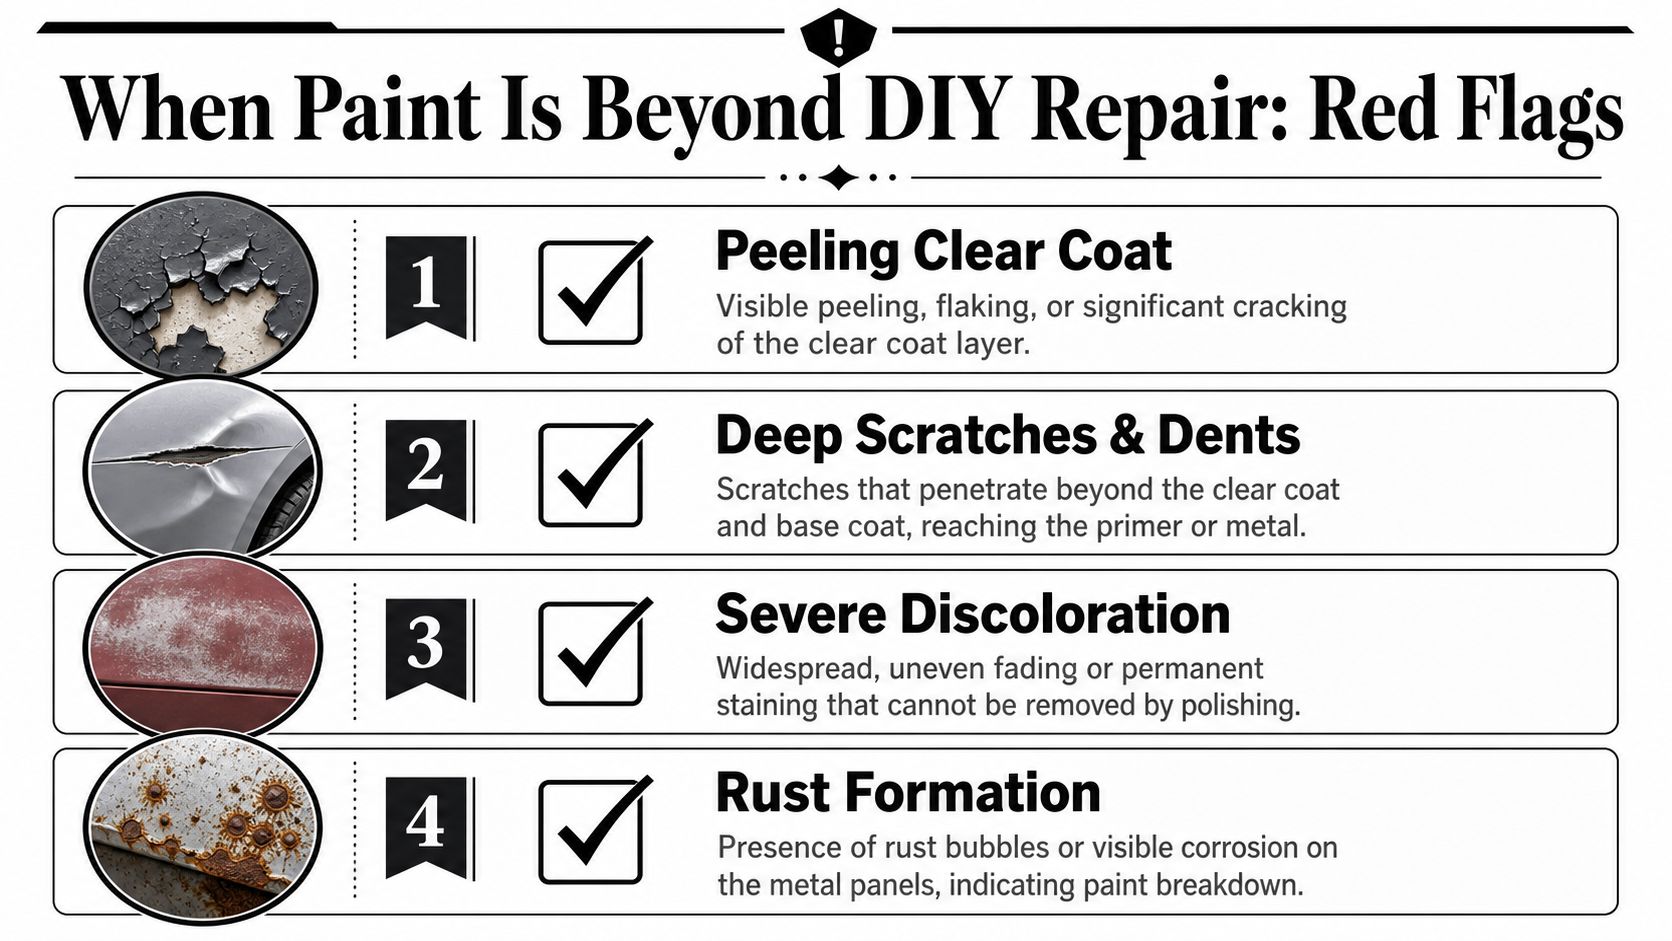
A major gap in most DIY advice is helping owners tell the difference between fixable clear-coat oxidation and base-coat failure. The important rule is simple. Once oxidation reaches the primer or metal, mechanical removal is no longer possible without repainting, as noted in this discussion of paint oxidation limits and professional intervention.
That source also points out that a practical diagnostic checklist is often missing from mainstream tutorials, which is exactly why so many owners keep polishing paint that can't be saved by polishing alone.
A stop-work checklist
Put the machine down if you see any of these:
- Peeling or flaking clear coat: The top layer is physically failing, not just dull.
- Exposed lower layers: You can see primer, metal, or obvious color loss in spots.
- Deep scratches with sharp edges: If damage extends beyond the upper finish layers, polishing won't remove it safely.
- Uneven, patchy dead zones: Some areas may shine after correction while others stay flat and lifeless.
- No improvement after careful passes: If your test spot doesn't recover after multiple controlled attempts, stop escalating.
Two simple field checks
You don't need a lab to make a reasonable call.
One is the fingernail check. If a defect edge catches sharply and looks like a layer boundary rather than simple surface dullness, treat it cautiously.
The other is pattern reading. If the panel has broad, even dullness, correction may still help. If the damage is blotchy, peeling, or ringed around failing spots, you may be looking at coating failure rather than surface oxidation.
Some paint needs polishing. Some paint needs repainting. Knowing which is which is where smart detailing starts.
The hard truth is that a machine can only remove damaged material until healthy material appears underneath. If there isn't healthy material left to reveal, the process ends there.
How to Prevent Future Paint Oxidation
Once the finish is corrected and protected, keeping it that way is mostly about habits. Small, consistent care beats another major correction job every time.
Maintenance habits that make a difference
- Wash safely: Use quality soap, a clean mitt, and drying towels that won't drag grime across the surface.
- Keep protection fresh: Reapply your chosen protection on a schedule that matches the product and how the vehicle is used.
- Park smarter: Shade, covered parking, or a car cover reduce sun exposure and slow surface breakdown.
- Clean off contaminants quickly: Bird droppings, bug remains, and tree sap get harder on paint the longer they sit.
- Inspect the horizontal panels often: The roof, hood, and trunk usually show trouble first.
Don't wait for the paint to look bad
By the time oxidation is obvious, the surface has already been under stress for a while. Catching early dullness is a much better situation than correcting heavy chalking later.
If you don't want to stay on top of all of this yourself, regular professional maintenance can take a lot of the guesswork out of it.
If your vehicle's paint looks chalky, faded, or uneven and you're not sure whether it needs polishing or a more serious repair plan, GP Mobile Car Wash & Detail can help you sort that out. We serve Lincoln, Nebraska with mobile detailing and shop service, and we can evaluate whether your paint is a good candidate for correction, protection, or a referral for bodywork when polishing won't solve the problem.