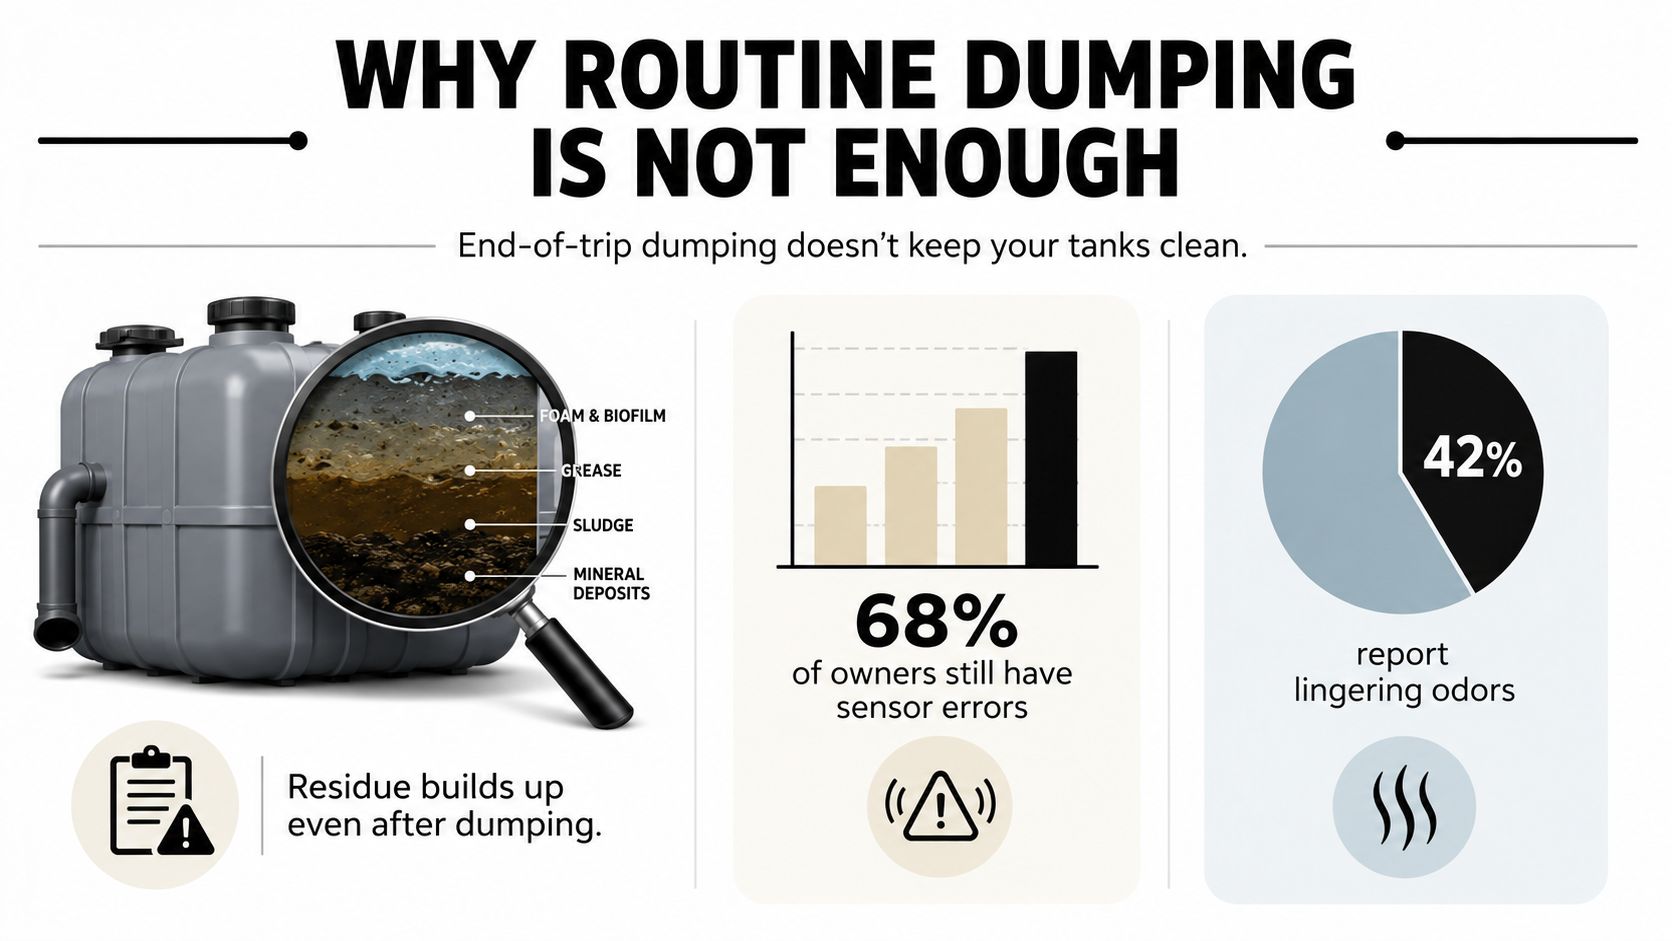
Most RV advice starts with the wrong promise. Dump the tanks, rinse with a hose, toss in a product, and you're done. That routine helps, but it doesn't remove what sticks to the walls, settles in corners, or coats the sensors.
The bigger problem is that RV wastewater is not light-duty waste. A Transportation Research Board study of 72 samples found average concentrations of 3,110 mg/L BOD5, 8,230 mg/L COD, 3,120 mg/L TSS, 2,640 mg/L VSS, and 170 mg/L formaldehyde in RV holding-tank waste (TRB study PDF). That's why a quick dump can leave behind residue, odor, and the film that turns level sensors into liars.
Why Routine Dumping Is Not Enough
Dumping a tank empties it. It does not restore it. Gravity clears the liquid, but it does not remove what has bonded to plastic, settled in dead spots, or turned into a greasy film on the sensor pads.
What keeps building up inside
RV holding tanks collect more than waste water. They collect solids, biofilm, grease, toilet paper residue, scale, and whatever chemical load was already in the waste stream. In practical terms, that means the tank can look empty while the surfaces still carry enough contamination to cause smell and inaccurate readings.
The wastewater numbers explain why. A stream with 3,110 mg/L BOD5 and 8,230 mg/L COD is chemically concentrated, not diluted household runoff. The high TSS and VSS values also point to a lot of suspended and volatile solids that can settle or smear onto tank walls and sensors. As noted earlier, that is the kind of load that leaves residue behind after a basic dump.
Owners often chase odor first, but sensor problems are usually the more stubborn headache. The tank can smell better after a rinse and still read full, or stick at partial even after a dump. That happens when residue coats the sensor contacts and slimy deposits cling to the tank wall, which keeps sending false signals long after the obvious waste is gone.
Practical rule: If the rinse water runs clear but the readings stay wrong, the tank still needs cleaning.
Routine dumping is maintenance. Deep cleaning is restoration. Treating those as the same thing is why so many RVers keep repeating the same cycle without fixing the underlying problem.
Tools and Chemicals You Need Before Starting
Cleaning RV holding tanks the right way starts with the right gear, not with whatever bottle happens to be under the sink. The job is to loosen what is stuck, move it out safely, and avoid adding chemicals that make sensors, seals, or plumbing worse.
Build a safe, RV-specific setup
For chemicals, stick with RV-safe enzyme treatment, tank-specific detergents, and biodegradable degreasers. Enzyme products are made to break down organic waste instead of just covering odor. If you want a broader product shortlist for safer household-style options, this non-toxic cleaning products guide is a useful reference point for ingredient safety, even though RV tanks still need chemistry chosen for waste systems.
Keep the kitchen-sink mindset out of the tank bay. Products that foam heavily, strip aggressively, or rely on harsh oxidation can create new problems instead of fixing the old ones. Anything that leaves a slick residue or a strong scent layer can make sensor troubleshooting harder, because the tank may smell cleaner while the buildup is still there.
The hardware that actually helps
A proper setup usually includes a tank flush wand or built-in flush system, a backflow preventer, a clear sewer adapter, and a dedicated sewer hose reserved for waste work only. The clear adapter matters because you need to see when outflow changes from cloudy to clean. The backflow preventer matters because contamination should never travel into the freshwater side.
A flush wand reaches wall buildup that plain gravity does not touch. A dedicated hose keeps the job sanitary and reduces the chance of cross-contamination between wash water and waste water. For stubborn tanks, that extra visibility and control is often the difference between a partial rinse and a real cleaning.
Don't skip the safety gear
Wear chemical-resistant gloves, eye protection, and work with decent ventilation. Tank work can splash, aerosolize residue, and expose you to concentrated waste on fittings and hose ends. If you are reaching into a service bay or working close to an outlet, treat it like dirty utility work, not light cleaning.
One more practical item belongs on the list, a measuring cup or marked container for accurate dosing. Too little product will not move buildup. Too much can leave residue that keeps the tank from behaving normally. The same caution applies to stronger treatments and bleach-based shortcuts, which can damage seals, throw off sensor readings, and leave the tank harder to flush fully.
The Complete Flush and Soak Cleaning Sequence
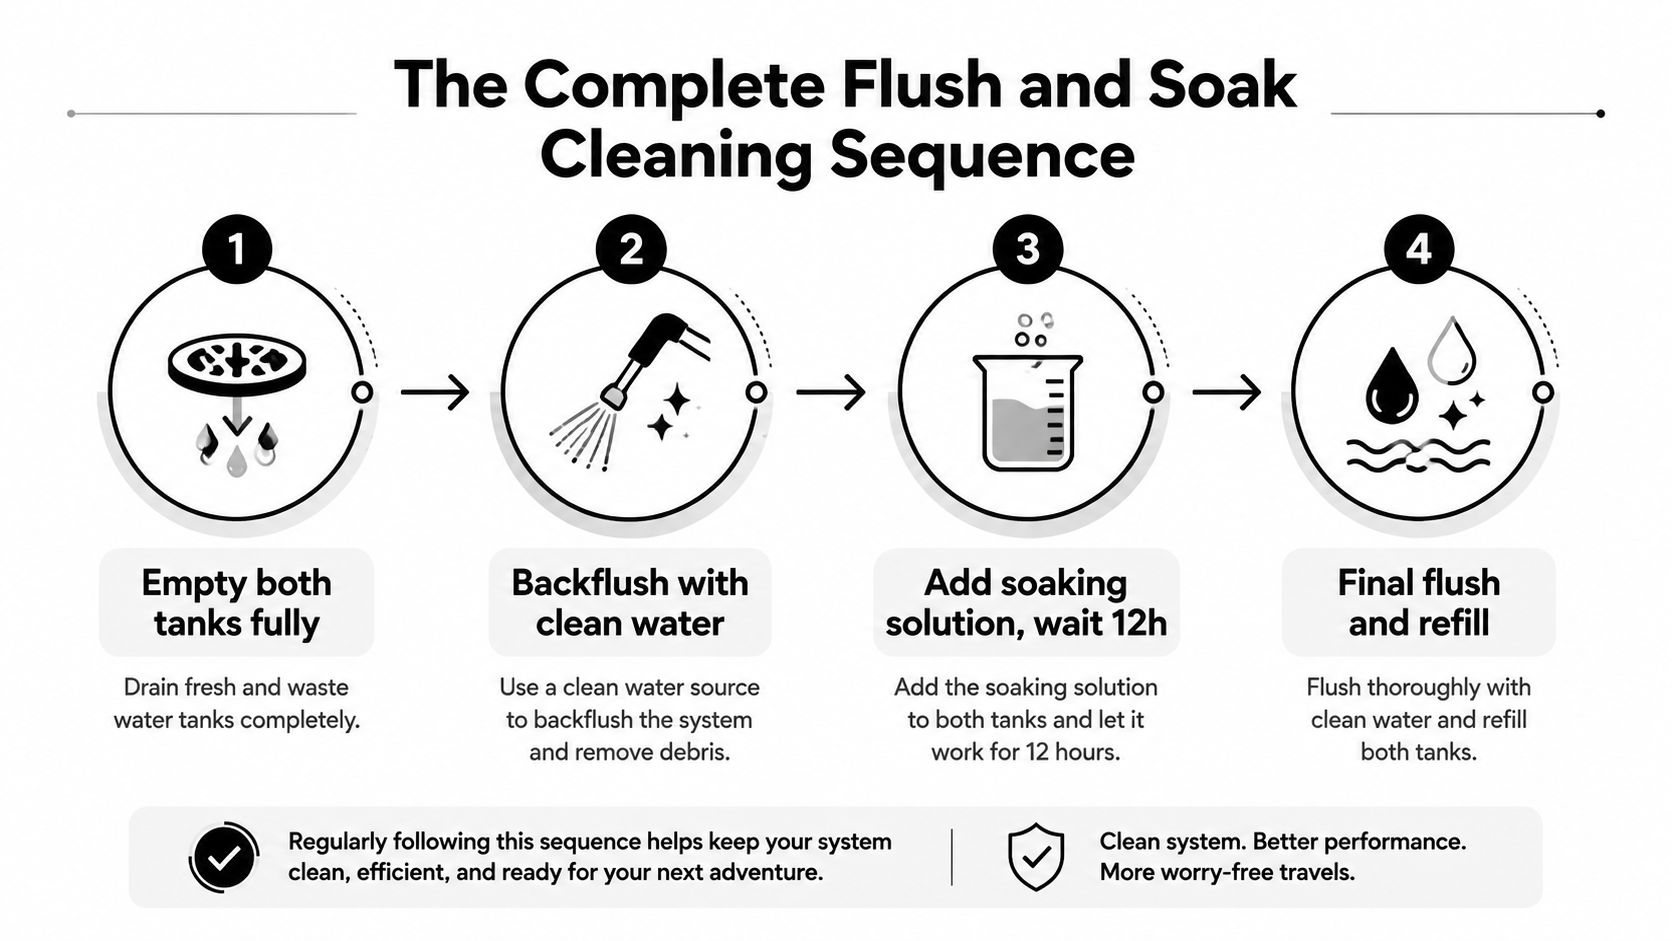
A real tank cleaning follows a simple logic, dump first, loosen second, then rinse until the tank is clean. Most bad results come from skipping the middle part, especially agitation and soak time. The solution needs contact time and movement, or it just sits in the bottom like scented water.
The basic workflow is confirmed by RV maintenance guidance, dump the tank, add cleaner plus plenty of water, agitate by driving or using a flush system, let it soak, then dump and rinse thoroughly (RV Life cleaning guide). That order matters because cleaner can only work where it can reach.
A short visual refresher helps here before the moving parts begin.
Start with a truly empty tank
Dump the black tank first, then the gray tank if you're using gray water to rinse the sewer hose. Multiple RV maintenance guides also recommend waiting until the black tank is roughly 50% to 75% full before routine dumping, then flushing with fresh water until the outflow runs clear (NTOTank cleaning guide). That routine helps carry waste out more completely than premature dumping.
After the dump, add your cleaner with enough water to let it reach the walls and sensor area. A dry tank is the enemy here. You want the solution sloshing, not pooling.
Agitate, soak, then agitate again
Driving is one of the most effective forms of agitation because it lets the solution move through corners and along the tank floor. If the RV is stationary, use the built-in flush system, a flush wand, or repeated rinses to create as much movement as you can.
Soak time is where stubborn residue starts to loosen. If buildup is light, one cycle may be enough. If the tank has been neglected, repeat the sequence instead of trying to brute-force it with more chemical in one shot.
Keep several gallons of water in the black tank after cleaning. That helps prevent drying and makes the next dump more effective.
Finish with a rinse that earns its name
Rinse until the outflow runs clear, then rinse again. Clear water is a sign, not a guarantee, so use it as one checkpoint, not the finish line. If the tank still smells, the sensors still misread, or the output looks gritty after a second rinse, the cleaning cycle wasn't complete.
A useful habit after every cleaning is to leave some water in the tank rather than storing it dry. Dry walls encourage buildup, and buildup is what you're trying to stop from becoming the next repair bill.
Troubleshooting Sensor Errors and Persistent Odors
A monitor panel can look guilty, but a dirty tank is usually the real problem. Technicians see this often in the field. Sensors that read full after dumping, bounce around, or stay stuck are usually responding to residue, not a dead panel. The link between odor complaints and sensor complaints is just as practical as the Happy Campers World RV holding-tank statistics suggest, dirty sensors show up far more often than true hardware failure.
Dirty sensors versus failed sensors
A dirty sensor can often be improved with a proper deep clean. Waste film, slime, and mineral scale can form a conductive bridge across the probe area, which makes the monitor think waste is still present when the tank is empty or mostly empty. A failed sensor behaves differently. It stays wrong even after the tank has been flushed, soaked, and rinsed, because the probe, wiring, or monitor has a real electrical problem.
The simplest test is to watch the reading after a full flush cycle and a thorough soak rinse. If the display responds normally for a while and then starts lying again, residue is still coating the sensing area. If the reading never makes sense, even with an empty, rinsed tank, the problem is more likely electrical than sanitary.
Odor that survives dumping has a source
A tank that still smells after dumping is usually pointing to one of three places, the tank surface, the vent path, or the seal area. If the odor returns fast after a dump, film on the tank walls can keep feeding bacterial growth. If the smell is strongest near the toilet or sink, the vent or seal deserves attention before you chase the tank with more cleaner.
For odor work that goes beyond the tank itself, the odor removal guide is a useful companion because the same rule applies, remove the source instead of masking it with fragrance.
A practical diagnostic order
- Check the vent path first: A blocked or restricted vent can trap odor and make the tank seem worse than it is.
- Inspect the seal surfaces: Toilet seals and fittings that do not seat correctly will leak smell even when the tank is clean.
- Clean the sensor area: Run a full deep-clean cycle before assuming the sensors are dead.
- Repeat the rinse if readings stay off: If residue is still present, one pass usually will not fix it.
- Stop forcing it if the problem is electrical: Corroded wiring or damaged probes need repair, not more cleaner.
When a tank still smells after proper flushing, that is useful information. The odor is either coming from what is still stuck inside, or from a path that cleaning alone will not correct.
Home Remedies Versus Evidence-Backed Treatments
RV forums are full of habits that get repeated because they're familiar, not because they work well. Some of them are harmless in small doses, some are weakly useful, and some can make tank care worse by attacking seals, creating foam, or leaving residue behind. The hard part is separating tradition from a method that cleans effectively.
What the common remedies do and don't do
Bleach is the easiest example. It may seem like a fast disinfectant, but it isn't a good tank-cleaning strategy because it can be hard on rubber seals and it doesn't solve buildup on its own. Dish soap such as Dawn can help loosen grease in a kitchen context, but in a holding tank it can create foam that interferes with sensor behavior and doesn't break down hardened residue the way a tank treatment is supposed to.
The ice method gets talked up because people hope the sloshing cubes scrub the walls. In practice, the cleaning effect is limited compared with real flush flow, soak time, and agitation. Ice might move loose material around, but it doesn't replace a proper chemical and rinse sequence.
The tank doesn't need a rumor. It needs contact, time, and a rinse that removes loosened waste.
Evidence-backed choices that make sense
For routine maintenance, use a product designed for RV waste systems, especially enzyme-based treatments and tank-safe cleaners. Those are meant to support ongoing performance after the tank is already reasonably clean. For deep cleaning, use a corrective cleaner plus enough water, then follow with agitation and thorough rinse cycles.
The biggest mistake is using a maintenance treatment in a tank that already has buildup. That's like putting polish on dirty paint. It may smell better for a day, but it doesn't restore the surface underneath.
The simple recommendation framework
- Use enzyme treatments for upkeep: They fit routine care and ongoing odor management.
- Use a corrective cleaner for buildup: That's the right tool when sensors are sticky or odors won't quit.
- Avoid harsh home chemistry: Bleach and similar shortcuts can create new problems.
- Treat ice and dish soap as limited helpers, not deep-clean methods: They're not substitutes for flushing and soaking.
- Choose products that are tank-specific: RV systems need chemistry that respects seals, plumbing, and sensors.
GP Mobile Car Wash & Detail also works with RV and boat detailing, so owners who want exterior and interior cleaning handled alongside vehicle care can use one service provider instead of piecing together unrelated products and routines.
Building a Seasonal Maintenance Schedule
A good maintenance schedule has to match how the RV is used. A full-time traveler, a weekend owner, and a seasonal camper do not load tanks the same way, and they do not need the same cleaning rhythm. The point is to keep routine maintenance simple enough that it gets done on time, while saving deep cleaning for the moments when ordinary dumping stops working.
Match the schedule to the usage pattern
| Usage Pattern | Routine Dump Frequency | Deep Clean Frequency | Professional Service |
|---|---|---|---|
| Full-time RV use | After normal fill level and use pattern, based on tank demand | Periodically when buildup, odor, or sensor problems appear | When cleaning no longer restores flow or readings |
| Weekend use | After each trip or when tanks are adequately full | Seasonally or when sensors and odor start acting up | When buildup persists after repeated rinsing |
| Seasonal storage use | Before storage and after de-winterizing | Before storage if residue has been a problem | Before winterizing if deposits harden between trips |
That schedule is practical because usage changes how fast residue collects, and storage changes how hard it is to remove later. The same tank can behave very differently depending on whether it sits lightly used, gets heavy weekend use, or spends long periods in storage. The broader maintenance timing also fits with a vehicle maintenance schedule that accounts for how each system ages under real use. Sources discussing RV tank care commonly recommend annual professional flush or hydro-jet cleaning and pre-winterizing service, especially when buildup or sensor issues keep returning (Kleentank questions guide).
When professional help starts making sense
Professional tank cleaning is still a relatively small part of the market, but it is a useful option for owners who are tired of chasing the same odor or sensor problem. As noted earlier, compiled industry figures place professional tank cleaning use in a modest range, and they also point to typical multi-tank service pricing in a few-hundred-dollar band (Happy Campers World RV holding-tank statistics). That gives a rough sense of when owners decide the job has outgrown a standard rinse.
The turning point is usually not smell alone. It is smell plus sensor failure, slow drain, recurring sludge, or a tank that still acts dirty after proper flushing. Once those symptoms stack up, a professional hydro-jet or flush service can be worth more than another round of household fixes.
Seasonal habits that prevent hardened deposits
Pre-storage cleaning matters because residue gets harder when it sits. Before winterizing, dump completely, rinse thoroughly, and leave the tank in a condition that will not dry into crust. Before the first trip of the season, reintroduce water and confirm the sensors and flow are behaving before the tank gets loaded again.
If you keep one habit from this whole schedule, make it the water level. A tank left dry between uses is more likely to develop stubborn buildup than one that stays lightly primed.
Keeping Your Tanks Clean All Season Long
A realistic season usually starts with one solid reset. The owner de-winterizes, dumps what's left, performs a flush-and-soak cycle, and checks the sensors before the first long trip. If the readings are still messy, the tank gets another cleaning before the next outing instead of waiting for the smell to become obvious.
Midseason, the best habit is boring and consistent. Dump when the tank is adequately full, rinse until the outflow runs clear, and leave water in the tank afterward so deposits don't dry onto the walls. That keeps routine maintenance doing its job, which is to prevent the buildup from ever becoming a bigger project.
By fall, the same owner cleans before storage instead of after months of neglect. That one choice keeps hardened residue from setting up over the off-season, and it reduces the odds that the first spring trip begins with a sensor problem and a bad odor instead of a clean start.
GP Mobile Car Wash & Detail offers mobile and shop-based cleaning services in Lincoln, Nebraska, including specialized care for RV and boat detailing. If you'd rather hand off exterior cleaning and surface-safe maintenance while you keep your holding tanks under control, visit GP Mobile Car Wash & Detail to book service that fits your schedule.