Your floor mats usually tell the truth about how your car is being used. In Lincoln, that means white winter salt lines, spring mud, crushed gravel, melted snow, spilled coffee, and the musty smell that shows up when a mat went back in the car before it was fully dry.
The best way to clean car floor mats depends on one thing first. What they’re made of. Rubber and vinyl mats need force, rinse cycles, and groove-by-groove scrubbing. Carpet mats need a dry-first approach, controlled moisture, and much better drying than they usually receive.
A lot of drivers lose the battle at the end. They get the mat looking clean, then reinstall it damp. That’s how a car smells worse after cleaning than before. If you want mats that look right, feel right underfoot, and don’t stink a week later, the process matters.
Preparation The First Step to a Flawless Clean
If your mats are covered in salt crust, pet hair, and whatever came off your boots this week, don’t start spraying cleaner at them yet. Preparation decides whether the job goes quickly or turns into a muddy mess with half the dirt still stuck in the material.
Identify the mat before you clean it
The first job is simple. Pull the mats out and figure out what you’re working with.
Rubber, vinyl, and molded all-weather liners can take more aggressive rinsing and stiffer brushing. Carpet and fabric mats need more restraint because the face fibers, backing, and any padding underneath react differently to moisture and scrubbing.
That distinction matters because the wrong method creates new problems. Too much water on carpet mats slows drying and traps odor. The wrong cleaner on rubber can leave residue or a slick surface.
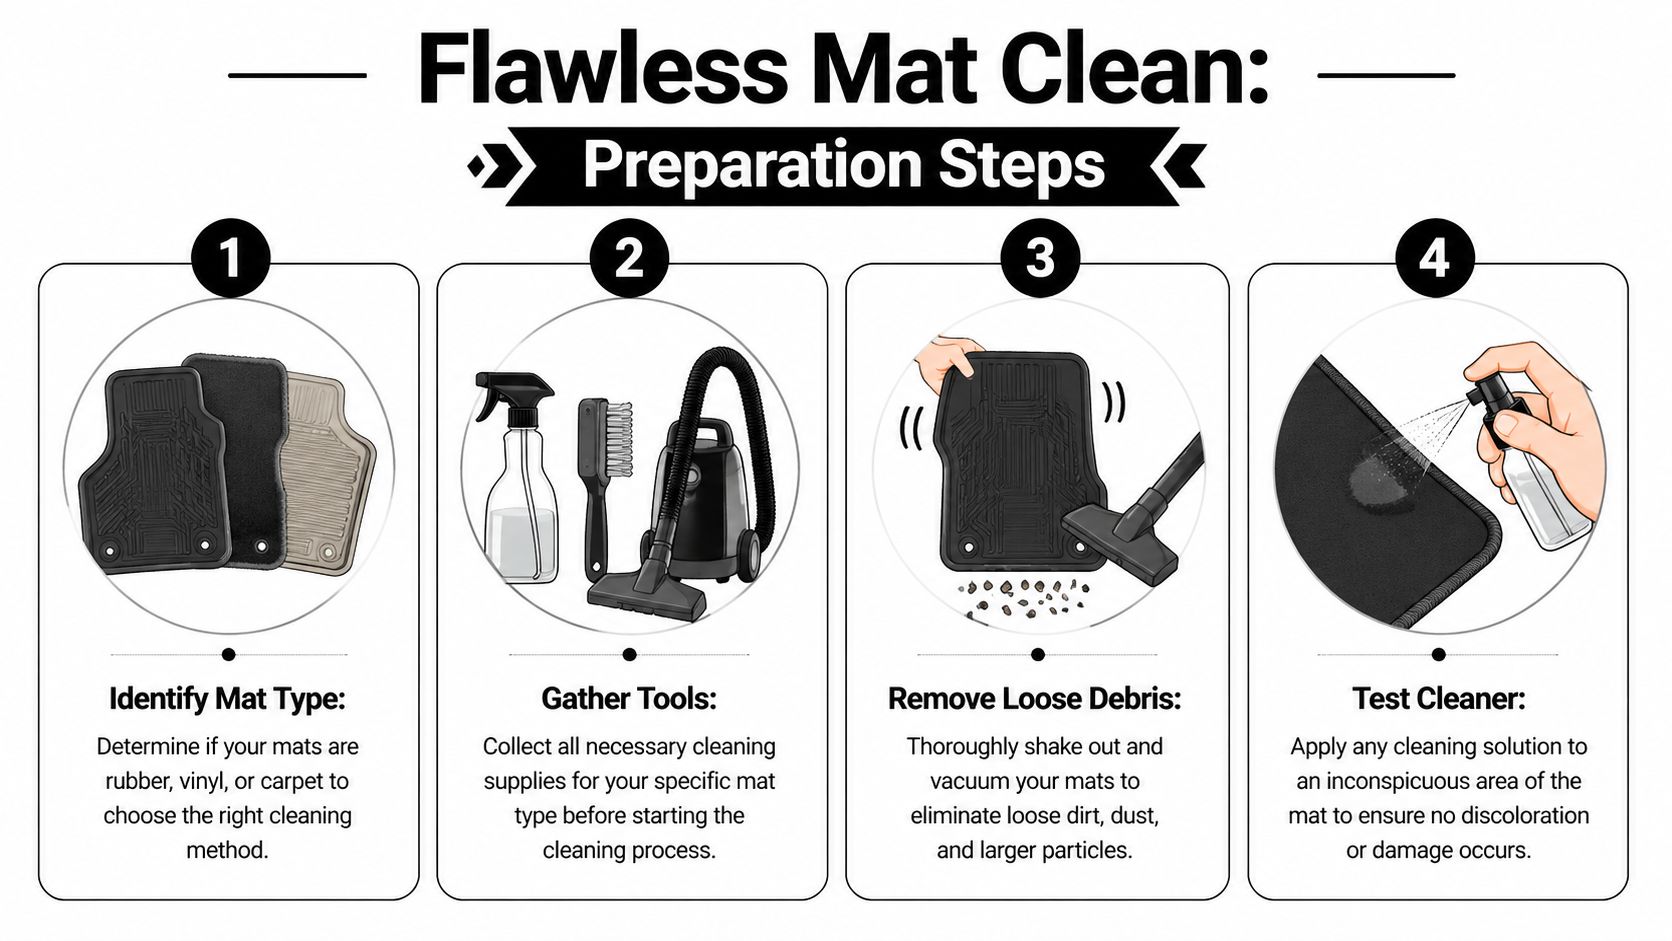
Start with dry removal, every time
Before any soap touches the mat, shake it out hard. If it’s carpet, vacuum both sides. If it’s rubber, knock loose debris from the channels and corners before rinsing.
This step seems basic, but it changes the whole job. Loose grit turns into slurry once it gets wet, and slurry is slower to remove than dry dirt.
Practical rule: Dry debris comes off easier than wet debris. Remove as much as you can before adding water.
Gather the right tools once
You don’t need a giant detailing cart, but you do need the right setup within arm’s reach. For most mat jobs, that means:
- For rubber or vinyl mats: a hose or pressure washer, mild degreaser soap, stiff-bristled brush, and microfiber towels
- For carpet mats: vacuum, upholstery or fabric cleaner, brush, baking soda for odor work, and ideally a wet/dry vacuum or extractor
- For all mat types: gloves, a clean rinse bucket, and a place to dry mats with airflow and sunlight when possible
A good prep setup also includes one habit people skip. Test any cleaner on a small hidden spot first. That’s especially smart with carpet mats, darker dyes, and aftermarket liners.
Quick Guide to Mat Types and Cleaning Methods
| Mat Type | Primary Material | Best Cleaning Method | Key Tools |
|---|---|---|---|
| Rubber mats | Rubber | Hose rinse, mild degreaser, stiff brushing | Hose, stiff-bristled brush, towels |
| Vinyl mats | Vinyl | Rinse and scrub grooves thoroughly | Hose, degreaser soap, stiff brush |
| All-weather liners | Rubberized or vinyl composite | Pressure rinse with careful brushing in channels | Pressure washer, brush, towels |
| Carpet mats | Carpet or fabric blend | Vacuum first, shampoo or steam clean, extract moisture | Vacuum, fabric cleaner, brush, wet/dry vacuum |
What to avoid before you begin
A few mistakes show up over and over:
- Using harsh household chemicals: If a cleaner isn’t suited for automotive interiors, skip it.
- Soaking carpet mats too early: Heavy saturation makes drying harder and can leave the backing wet long after the surface feels dry.
- Cleaning inside the vehicle: Remove the mats first. Dirt and cleaner overspray don’t belong on the factory carpet underneath.
- Rushing the setup: If you have to stop mid-job to find a vacuum, more dirt gets tracked around and the mats dry unevenly.
A clean result starts before the scrubbing does. Once the prep is right, the rest of the job gets much easier.
Mastering the Clean for Rubber and Vinyl Mats
Rubber and vinyl mats take abuse better than carpet, but they also hide grime better. Nebraska winter residue packs into grooves, under raised edges, and around heel pads. If you only shake them out, they’ll still look dingy and feel gritty.
Rubber and vinyl mats dominate 70 to 80% of the U.S. vehicle market, and the most effective cleaning method is a high-pressure hose with stiff-bristled brushing, which can reduce embedded dirt by up to 90%. For Lincoln drivers, that matters because road salt can make up 35% of mat residue, and this method can flush 95% of corrosive buildup, potentially extending mat life by 2 to 3 years according to Car and Driver’s guide to cleaning floor mats.

What works better than a quick rinse
A fast blast with the hose removes surface dirt. It doesn’t do much for packed salt paste, oily heel marks, or gravel wedged into molded channels.
The better approach is rinse, spray, scrub, rinse again. Work top to bottom so dirty water keeps moving off the mat instead of settling back into the grooves.
Use moderate pressure, not maximum force. You want enough pressure to flush dirt out, not enough to beat up the material.
The shop method for rubber mats
Use this when the mats are heavily soiled:
- Knock off loose debris first. Hit the mat edge against the ground and clear the large stuff before rinsing.
- Pre-rinse the face and underside. Get the channels wet so dried grime softens.
- Apply mild degreaser soap. Focus on heel areas, raised textures, and corners.
- Scrub with a stiff-bristled brush. Short overlapping passes work better than random circles.
- Rinse thoroughly. Keep flushing until runoff looks clean and no suds remain.
- Check the underside. A lot of grit hides where the mat contacts the carpet.
- Dry before reinstalling. More on that in the drying section, because that’s where people get sloppy.
Rubber mats don’t usually need stronger chemicals. They need better mechanical cleaning.
A stiff brush matters more than people think. Soft bristles glide over the top. Stiff bristles get into the grooves where winter grime settles.
Common mistakes on all-weather liners
These are the ones I’d avoid:
- Overusing dressing products: A shiny mat may look dressed up, but near the pedals, slick isn’t safe.
- Ignoring the edges: Raised lips trap runoff, and that’s where salt dries into a crust.
- One-pass washing: Dirty mats often need repeated rinse and scrub cycles before the channels release everything.
- Skipping the underside: If the bottom is dirty, that grime transfers right back into the vehicle.
If you want to see the process in motion, this walkthrough gives a useful visual reference.
When rubber mats are actually clean
Clean rubber doesn’t just look darker and fresher. Run a finger through the deep grooves. If you still pull out grit, salt dust, or greasy residue, the job isn’t done.
The best way to clean car floor mats made from rubber or vinyl is simple in theory. Pressure, soap, brush, rinse. The difference comes from being patient enough to clean the channels completely.
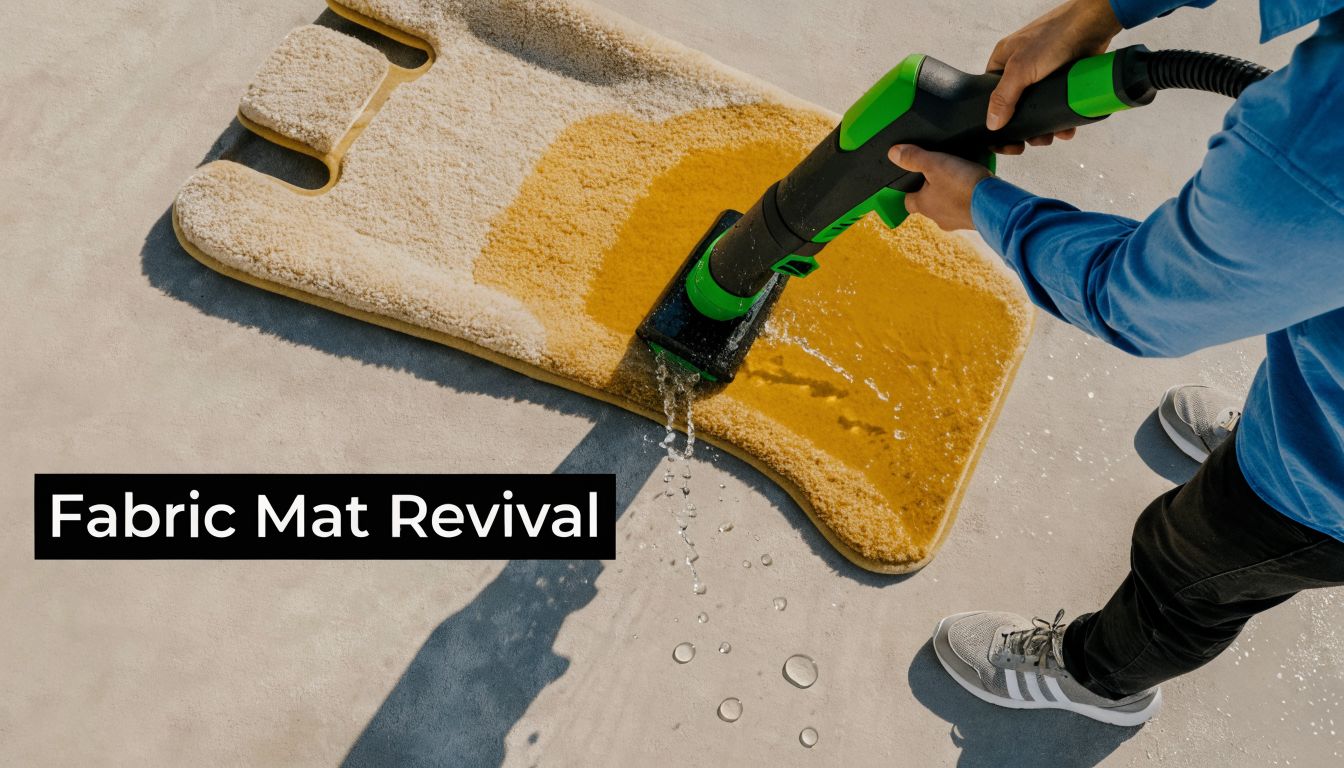
Deep Cleaning Your Carpet and Fabric Floor Mats
Carpet mats are where quick cleaning advice usually falls apart. They don’t just collect visible dirt. They hold dust, spills, hair, and odor down in the fibers and backing. If you go straight to soap and water, you can turn a dirty mat into a wet dirty mat.
For carpeted mats, vacuuming first removes 70% of loose dust and hair. A professional steam-enhanced method can deliver 97% sanitization and odor elimination, kill 99.9% of bacteria, restore pile height by 85% compared with water-only cleaning, and can extend mat life to double what simple soap scrubbing achieves, according to this step-by-step mat cleaning guide from Car Mats Culture.
Dry work comes first
Start with aggressive vacuuming on both sides. I’d also brush the carpet face before the main vacuum pass if the fibers are matted down. That helps release packed dust, sand, and pet hair.
If the mat has obvious stains, spot-treat those areas before full cleaning. Don’t flood the whole mat right away. Controlled product use is cleaner and easier to dry.
Two solid approaches that actually work
For lightly dirty mats, a fabric cleaner and brush may be enough. For family vehicles, pet messes, and stubborn odor, steam and extraction are much better.
| Condition | Best approach | Why it works |
|---|---|---|
| Light dust and mild soil | Vacuum, fabric cleaner, light agitation | Keeps moisture low and cleanup simple |
| Food spills or tracked mud | Spot treatment, scrub, wet/dry extraction | Pulls contamination out instead of spreading it |
| Pet odor or deep grime | Steam, cleaner, agitation, extraction | Cleans deeper into the fiber and backing |
| Flattened high-traffic areas | Steam finish and grooming | Helps lift the pile back up |
A practical carpet-mat routine
This is the sequence I trust most:
- Vacuum both sides well: Don’t just hit the face. The back side often hides loose grit.
- Apply cleaner with control: Mist or spray enough to work the fibers, not enough to soak the mat.
- Agitate by section: Use overlapping passes with a carpet brush. Focus on heel spots and edges.
- Extract what you loosened: A wet/dry vacuum or extractor is what separates cleaning from smearing.
- Use steam when the mat needs more than cosmetics: Steam helps with sanitation, odor, and fiber recovery.
A carpet mat that looks clean but still feels stiff or smells sour usually still has residue in it.
If you’re dealing with isolated spots like coffee, food grease, or set-in traffic marks, targeted interior stain work matters just as much as the overall wash. This guide on how to remove stains from car interior is useful if the mat problem is part of a bigger interior cleanup.
What doesn’t work well on carpet mats
A few shortcuts tend to backfire:
- Using too much shampoo: Residue attracts new dirt and can leave the fibers crunchy.
- Scrubbing wildly: Aggressive brushing can fuzz the surface without reaching the deeper contamination.
- Rinsing without extraction: Water alone moves grime around unless you remove it.
- Reinstalling when the top feels dry but the backing is still wet: That’s how odor comes back.
The best way to clean car floor mats made from carpet is a controlled process. Remove dry debris first, clean the fibers with purpose, then extract and dry thoroughly. That’s how you get a mat that smells neutral instead of perfumed over.
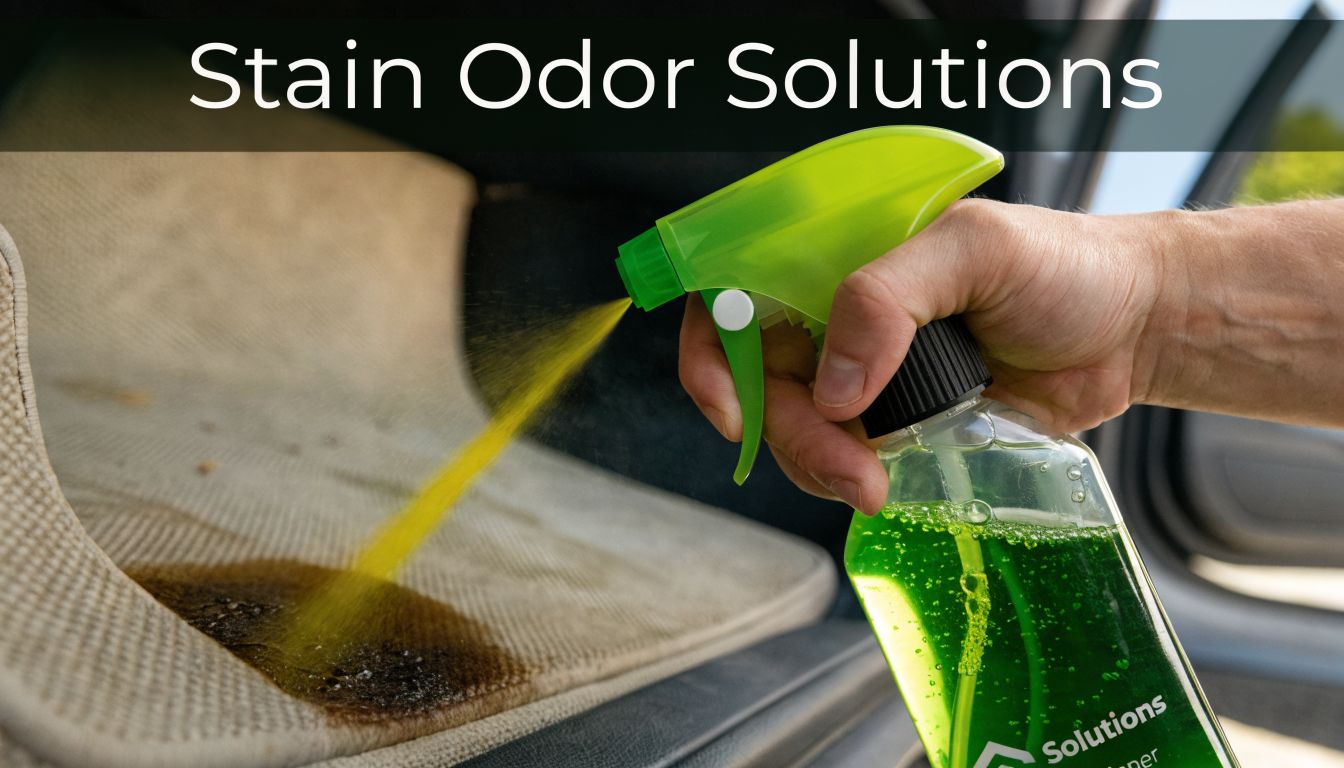
Tackling Tough Stains and Lingering Odors
A lot of people assume some mat problems are permanent. They’re not. What usually happens is the wrong fix gets used for the wrong mess. Coffee gets scrubbed like mud. Salt gets treated like dust. Odor gets covered with fragrance instead of removed from the fibers.
Carpeted floor mats are used in over 50% of family vehicles, can hold 80% of tracked-in allergens, and baking soda before shampooing can absorb up to 85% of odors and stains in protocols tested on over 500 vehicles, according to Rocket Car Wash’s mat cleaning guidance.
Match the fix to the stain
Not every stain should be attacked the same way.
- Coffee and soda spills: Blot first. Then use a fabric-safe cleaner and light agitation. If you scrub immediately and hard, you drive the spill wider.
- Greasy food marks: Use a non-toxic all-purpose cleaner sparingly and work in short passes with a brush. Grease needs breakdown, not just water.
- Mud: Let thick mud dry if it’s excessive, then vacuum and brush before wet cleaning. Wet mud spreads fast.
- Winter salt lines: These often come back after the surface dries because residue stayed lower in the fibers or around the mat edge. Re-cleaning with better flushing and extraction usually solves that.
- Pet accidents or organic messes: Enzyme-based fabric cleaners are the first thing I’d reach for, followed by extraction.
Odor removal has to be mechanical
Air fresheners don’t fix a mat. They only change what you smell first.
Real odor work comes from removing the material causing the smell, then drying the mat fully. On carpet mats, baking soda can help as a pre-treatment before shampooing when the odor is broad and general rather than coming from one heavy contamination point.
A better way to handle bad smells
Try this order instead of random product layering:
- Vacuum and inspect the mat dry
- Use baking soda on odor-heavy carpet mats
- Clean with fabric-safe product
- Extract or vacuum out the loosened contamination
- Dry completely before reinstalling
If the odor gets stronger after cleaning, moisture is probably still trapped in the mat or underneath it.
For broader cabin odor problems, especially if the floor mats are only one part of the issue, this guide on how to get rid of bad smell in car is worth reading alongside your mat cleanup.
When a stain keeps returning
Recurring spots usually point to one of three issues:
| Problem | Likely reason | Better fix |
|---|---|---|
| Stain reappears after drying | Residue stayed below the surface | Reclean and extract more thoroughly |
| White lines come back | Salt remained in lower fibers or edges | Flush and remove residue in stages |
| Musty smell returns | Mat dried on top, stayed damp underneath | Extend drying and increase airflow |
The worst approach is piling on more fragrance or more cleaner each time. That builds residue, and residue attracts soil. A mat should feel clean, not sticky, filmy, or heavily scented.
Some mats are worth saving. Others tell you they’ve been neglected too long. But a surprising number come back once the stain type is identified correctly and the odor source is physically removed instead of disguised.
The Critical Final Step Proper Drying and Reinstallation
Most bad mat-cleaning results aren’t caused by the wash step. They’re caused by impatience after the wash. The mat looks dry, feels mostly dry, and goes back in the car. Then the windows fog, the cabin smells damp, and the problem starts over.
Improperly dried mats can cause mold and the familiar damp smell, which accounts for 70% of related complaints from car owners. In Nebraska, where summer humidity averages 65%, carpet mats can retain 15% more water than rubber, so drying until 0% moisture is detected is essential according to Caliber Car Wash’s discussion of car mat drying and odor problems.
Rubber and carpet dry differently
Rubber and vinyl mats shed water faster. Once they’re rinsed, you can towel them, stand them up, and let moving air finish the job. Carpet mats are slower because water hides in the fibers, backing, and edges.
That difference matters in Lincoln summers. A humid day can leave a carpet mat feeling dry on the face while the underside still holds moisture.
Drying habits that prevent odor
Use a more deliberate routine:
- Stand mats upright when possible: Air reaches both sides better than when the mat lies flat.
- Keep airflow moving: Open garage doors, box fans, or outdoor breeze help more than still air.
- Blot or extract first: The less water left in the mat, the safer the drying phase.
- Check edges and backing by hand: Those spots stay wet longer than the center.
- Wait longer than you think you need to: Reinstalling early costs more time than waiting once.
The mat isn’t dry because the surface feels dry. It’s dry when the whole mat is dry.
A practical Lincoln-specific drying mindset
Winter creates one kind of mess. Summer creates another. In winter, mats come in loaded with slush and salt. In summer, humidity slows evaporation and keeps carpet damp longer. That’s why the same cleaning method can work fine in one season and leave odor in another.
If you cleaned carpet mats heavily, give them extra airflow before they go back in the vehicle. Also check the factory carpet underneath. If that area got wet while the mats were dirty or during removal, the smell may be coming from below, not from the mat itself.
Reinstall only when you’re sure
A quick final checklist helps:
| Check | What you want |
|---|---|
| Surface feel | No cool dampness |
| Backing and edges | Fully dry to the touch |
| Smell | Neutral, not sour or humid |
| Vehicle floor underneath | Dry and clean |
| Fit after reinstall | Flat, secure, no curling |
Drying is where a careful job becomes a lasting result. Skip the rush, and you’ll avoid the musty smell that makes people think cleaning “didn’t work.”
Maintaining Your Mats and Knowing When to Call a Pro
A deep clean fixes the current mess. Maintenance keeps it from becoming a project again next weekend. The goal isn’t to make mat care complicated. The goal is to stop buildup before it hardens into salt crust, stain rings, or embedded grime.
For most drivers, consistency beats intensity. A quick shake-out and vacuum goes a long way if you do it before dirt packs in. This matters even more for family vehicles, work trucks, and cars that see a lot of stop-and-go use around Lincoln.
A routine that’s realistic
Try a simple pattern instead of waiting until the mats look terrible:
- After messy weather: Pull mats out, knock off debris, and inspect for wet spots
- During normal upkeep: Vacuum carpet mats and wipe or rinse rubber liners as needed
- When spills happen: Treat them the same day if you can
- Before odor builds: Check underneath the mats, not just on top of them
That last point gets missed all the time. A clean-looking mat can still be sitting over dirty or damp carpet.
Small habits that save bigger work
The mats that stay in the best shape usually get a few basic things right:
| Habit | Why it helps |
|---|---|
| Remove debris before it gets ground in | Cuts down on fiber wear and heavy scrubbing |
| Clean spills quickly | Lowers the chance of set-in stains and odor |
| Let mats dry fully after rain or washing | Prevents mildew problems |
| Inspect the mat anchors and fit | Keeps the mat flat and safer underfoot |
Clean mats last longer when you treat maintenance as prevention, not rescue.
Fabric protectants can help on carpet mats if you choose products intended for automotive interiors and apply them lightly. The point is easier cleanup later, not coating the mat so heavily that it feels stiff or attracts residue.
When DIY stops making sense
Sometimes cleaning mats yourself is the right call. Sometimes it isn’t.
A professional service makes more sense when:
- The mats are heavily saturated: Deep moisture is hard to remove without extraction equipment
- Odor keeps returning: That usually means contamination remains in the fibers, backing, or vehicle carpet
- You’re managing multiple vehicles: Fleet maintenance needs consistency and speed
- There’s a biohazard or severe organic mess: This isn’t the place for improvising
- You don’t have time or drying space: A rushed job is usually a repeat job
For larger interior resets, especially when the mats are only one part of a dirty cabin, scheduling a deep car interior cleaning service near you is often the smarter move.
Lincoln drivers deal with extremes. Salt in winter, humidity in summer, mud in between. The best way to clean car floor mats is the method that fits the material, removes contamination fully, and doesn’t stop before drying is complete. If you keep that standard, your mats will stay cleaner, smell better, and last longer.
If your mats need more than a quick rinse, GP Mobile Car Wash & Detail can handle the full job at your location or at the shop. The team serves Lincoln with interior deep cleaning, safe non-toxic products, and detail-focused care that works well for busy professionals, families, fleets, RVs, and boats.