So, how do you get rid of those frustrating swirl marks? The secret is a technique we call paint correction. This isn't just a simple polish; it's a careful process of leveling out the top layer of your car's clear coat to erase those microscopic scratches for good. It takes the right combination of compounds, polishes, and a machine polisher to bring back that deep, factory gloss.
Of course, none of that can happen until the vehicle is perfectly clean and decontaminated.
Why Your Car Has Swirl Marks and How to See Them
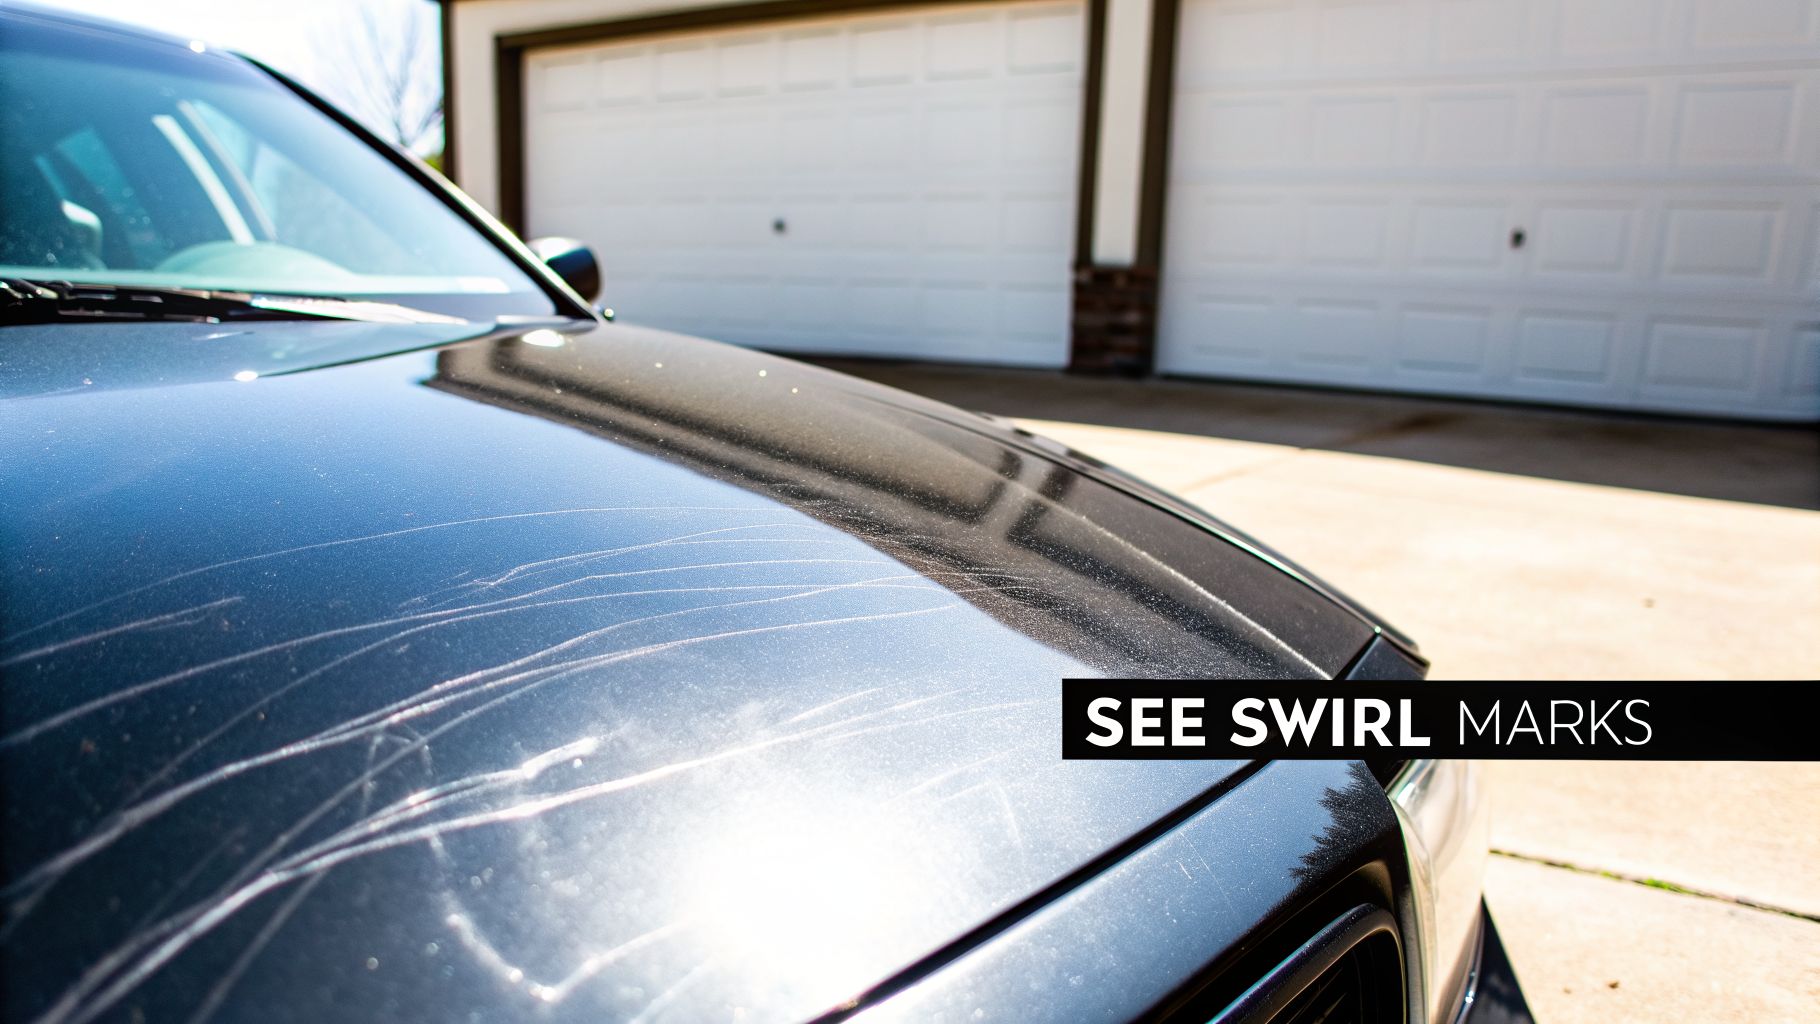
You know the moment. You're admiring your car in the bright sun, and suddenly you see it—a dizzying spiderweb of fine scratches covering the paint. Those are swirl marks. They aren't a flaw in the paint itself, but thousands of tiny scratches in the clear coat.
These scratches catch and scatter light in every direction, which is what dulls the finish and makes an otherwise beautiful car look worn out and neglected. They don’t just show up overnight, either. They’re the battle scars from daily driving.
The True Origins of Swirl Marks
Honestly, swirl marks are almost an unavoidable part of owning a car. Most people are shocked when I tell them that even brand-new vehicles sitting on the dealership lot often have fine scratches when you put them under a proper detailing light. It starts there and only gets worse.
Think about everything your car's paint endures: dirt, wind, road salt, and harsh UV rays. Even something as innocent as your jacket brushing against the door can add to the damage over time. It’s also why you see swirls so clearly on black or dark-colored cars, while they seem to disappear on silver or white finishes—they're still there, just harder to spot.
But the number one cause? Improper washing and drying. Dragging a single dirty sponge or gritty towel across your paint is like giving it a light sanding.
Here are the most common ways people accidentally scratch their paint:
- Automatic Car Washes: Those giant, spinning brushes hold dirt and grime from every car that went before you. It's a recipe for disaster.
- Improper Hand Washing: Using just one bucket means you’re dunking your mitt back into dirty water and rubbing that grit all over your car.
- Incorrect Drying: Never use an old bath towel or a cheap, stiff chamois. Wiping a dusty car with any dry cloth is a surefire way to create new scratches.
- Daily Driving: It's a constant bombardment. Road debris, dust, and grit kicked up from the road are always attacking your paint, creating tiny abrasions.
Key Takeaway: Swirl marks are rarely from one bad incident. They're the sum of countless micro-scratches from everyday exposure and, most importantly, bad washing and drying habits.
How to Properly Inspect Your Paint
You can't fix what you can't see. The first step to restoring your paint is getting an honest look at the damage. Just glancing at it in the garage or under a shade tree won't cut it. You need strong, direct light to reveal what's really going on.
There are two easy ways to do a proper inspection:
- Direct Sunlight: The sun is the ultimate truth-teller. Park your car so the sun is beaming directly onto a panel, like the hood. Step back and look at the reflection. Swirls will pop out as a clear, web-like pattern.
- Using a Detailing Light: For a more controlled look, a powerful LED flashlight or a dedicated detailing pen light is your best friend. Hold the light about a foot away from the paint and sweep it back and forth. This method exposes everything—not just swirls, but also deeper scratches you might have missed.
Start with the flat surfaces like the hood, roof, and trunk, since they usually take the most abuse. Then move on to the doors and fenders. This initial checkup gives you a clear picture of the damage and helps you plan your attack. Seeing the problem clearly is the first win on the road back to a perfect, mirror-like shine.
Gathering Your Paint Correction Tools and Supplies
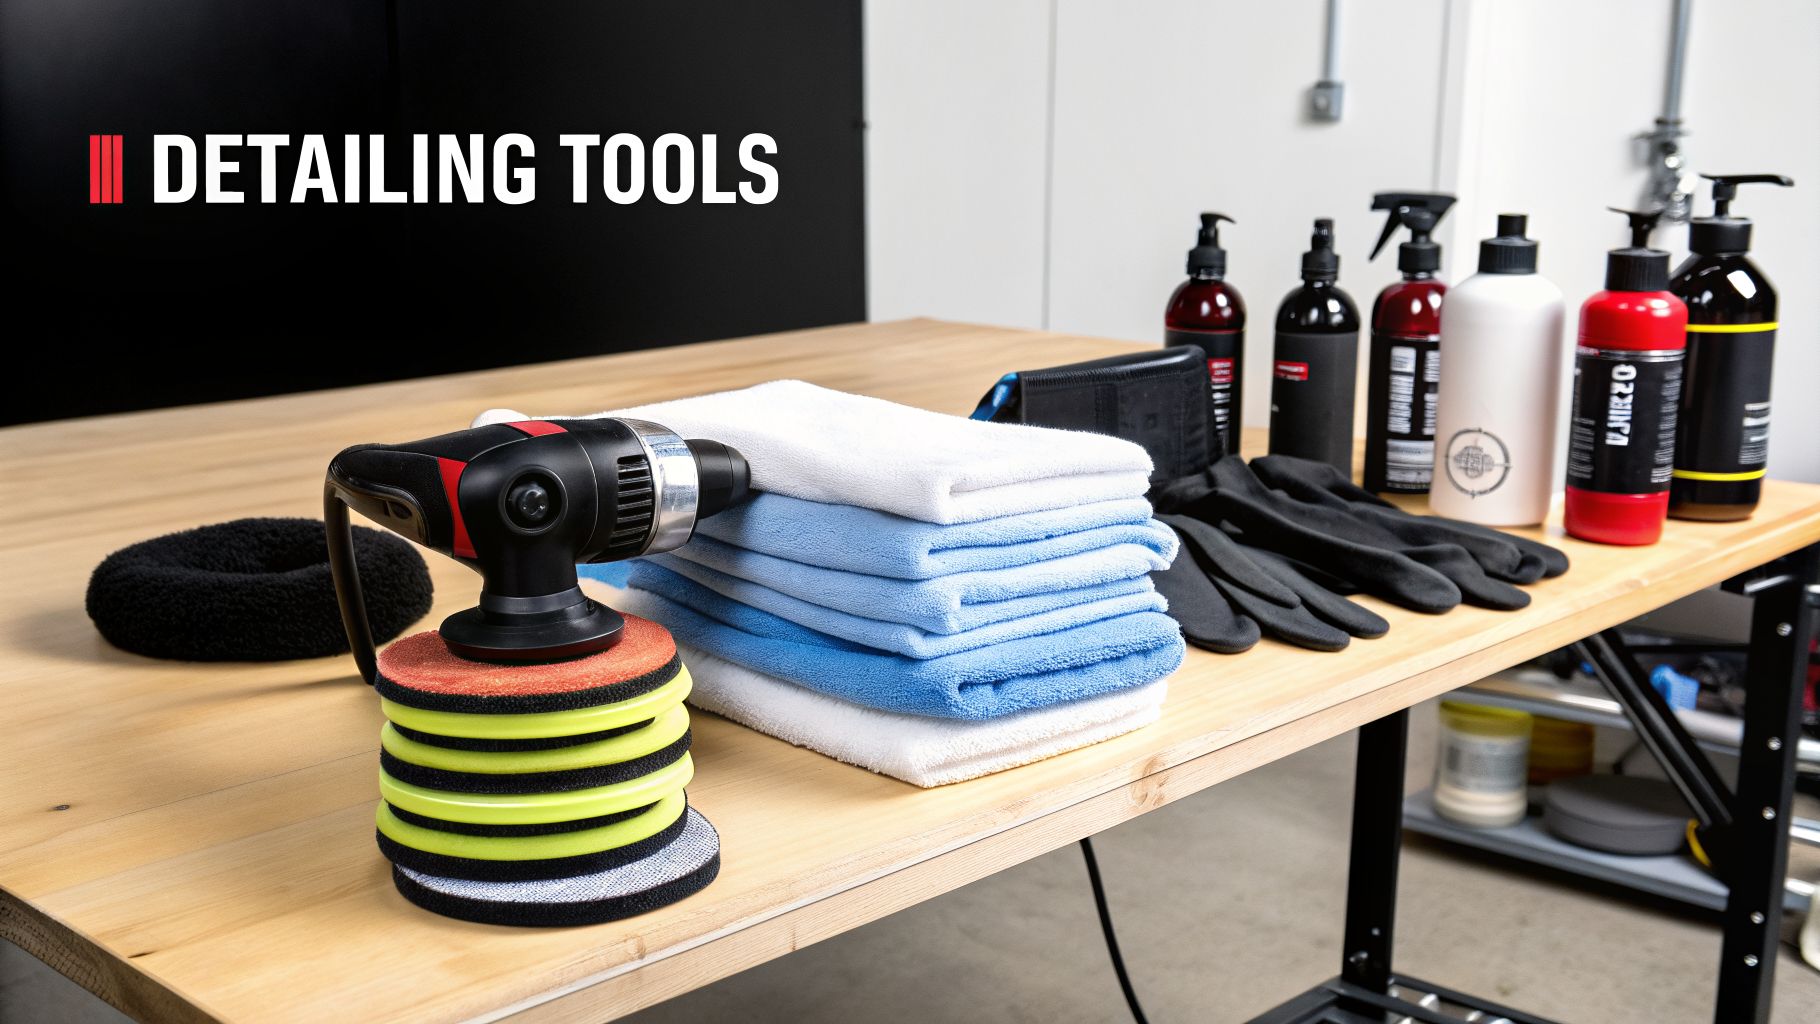
Before you can bring back that showroom shine, you have to assemble the right gear. Trying to remove swirl marks from car paint without the proper tools is a recipe for frustration—and you could even make the scratches worse.
This isn't about grabbing a random bottle of polish from the shelf. True paint correction means building a smart system of products that work together safely. Getting everything laid out first will save you from those annoying mid-project runs to the auto parts store and make the whole job go a lot smoother.
The Heart of the Operation: Machine Polishers
The single most critical piece of equipment you'll own is a machine polisher. While you can try removing very light swirls by hand, the amount of effort is huge, and the results are almost always patchy. A machine gives you the consistent speed and pressure needed to break down abrasives and perfectly level your car's clear coat.
You really have two choices here:
- Dual-Action (DA) Polisher: This is our top recommendation for anyone tackling this at home. It moves in a random, oscillating pattern that generates very little heat, which dramatically lowers the risk of you burning through your paint. It’s safe, effective, and the perfect starting point for beginners.
- Rotary Polisher: This beast spins on one fixed axis. While it removes deep defects much faster, it also creates a ton of heat and friction. In inexperienced hands, a rotary is notorious for causing holograms or even permanent paint damage. It’s best left to the seasoned pros.
For anyone just learning how to remove swirl marks from car paint, a quality DA polisher is a must-have. Brands like Griot's Garage and Porter-Cable make fantastic, user-friendly machines that will serve you well.
Compounds and Polishes: The One-Two Punch
Next, you need the liquids that do the actual work of removing scratches. These are nothing like the "cleaner waxes" you see everywhere. Real paint correction is at least a two-step process involving specific abrasive liquids.
Compounds are the heavy lifters. A cutting compound is packed with larger, more aggressive abrasives that cut into the clear coat to level out deeper swirl marks. Think of it as liquid sandpaper for your paint.
Polishes come in for the finishing touch. After compounding, your paint will look a bit hazy. A finishing polish uses tiny, fine abrasives to smooth out the micro-marring left by the compound, which is what brings back that deep, wet-looking gloss.
For beginners, a great starting combo is a medium-cut compound paired with a fine-cut polish. This duo is strong enough to handle most moderate swirls but is forgiving enough to keep you out of trouble.
Pads: The Unsung Heroes
Your polisher is just a paperweight without the right pads. Foam pads are sold in different colors and densities, with each one designed for a specific part of the job. Matching your pad to your product is absolutely critical.
- Cutting Pads: These are the firmest pads. They're built to be used with compounds for maximum cutting power.
- Polishing Pads: These are much softer and are paired with polishes to refine the paint and boost gloss.
- Finishing Pads: The softest of the bunch, these are used for applying a final layer of wax or sealant without adding any new scratches.
As a starting point, grab a set that has at least one of each type. Once you get more comfortable, you can start experimenting with other materials like microfiber pads, which offer even more cutting ability.
Essential Supporting Supplies
Finally, don't forget the little things. These items might seem minor, but they are just as important for getting a safe, clean, and professional result.
Make sure your shopping list includes:
- High-Quality Microfiber Towels: You can't have too many of these. You’ll need a clean, plush stack for wiping off residue without re-introducing scratches.
- Detailing Clay and Lubricant: This step is non-negotiable. You have to decontaminate the paint before you start polishing.
- Painter's Tape: Use this to carefully mask off any plastic trim, rubber seals, and emblems. Polish can easily stain these surfaces, and the tape will protect them.
- Safety Gear: It’s easy to forget, but always wear nitrile gloves and eye protection. Polishes can and will sling everywhere.
Prepping Your Paint for a Flawless Finish
Think about trying to polish a beautiful wooden table that’s covered in a fine layer of dust. You wouldn't just be wasting polish—you'd be grinding that grit right into the finish, creating a mess of new scratches.
That’s exactly what happens to your car’s paint if you jump straight to polishing. Trying to correct swirl marks on a surface that isn’t perfectly, microscopically clean is the number one way to make the problem so much worse. This prep stage is the foundation for everything else, and it's completely non-negotiable.
The Foundation: A Proper Wash
Before a polisher ever touches your paint, the car needs a truly meticulous hand wash. This isn't your average drive-thru wash or a quick bucket-and-sponge job. The entire goal is to lift away all the loose dirt and road grime without causing new scratches in the process.
This is why we, and pretty much every professional detailer, live by the two-bucket wash method.
It’s a deceptively simple system that makes a world of difference. One bucket is for your pH-neutral car soap, and the second is filled with plain water for rinsing your wash mitt. After washing a single panel, you dunk the dirty mitt into the rinse bucket first, which releases all the grit and grime you just picked up. Only then does it go back into the soapy water. This keeps your soap clean and stops you from dragging damaging grit all over your car.
A proper pre-correction wash looks like this:
- Pre-Rinse: Always start by giving the entire vehicle a thorough rinse, working from the top down. This safely removes the heaviest, loosest dirt before you make any physical contact.
- Wash and Rinse: Using your two buckets, a high-quality microfiber wash mitt, and a pH-neutral soap, gently wash the car one panel at a time. Start with the roof and work your way down.
- Final Rinse and Dry: Once every panel is clean, give the car one last complete rinse. Dry it carefully using a large, plush microfiber drying towel to avoid leaving water spots or creating new swirls.
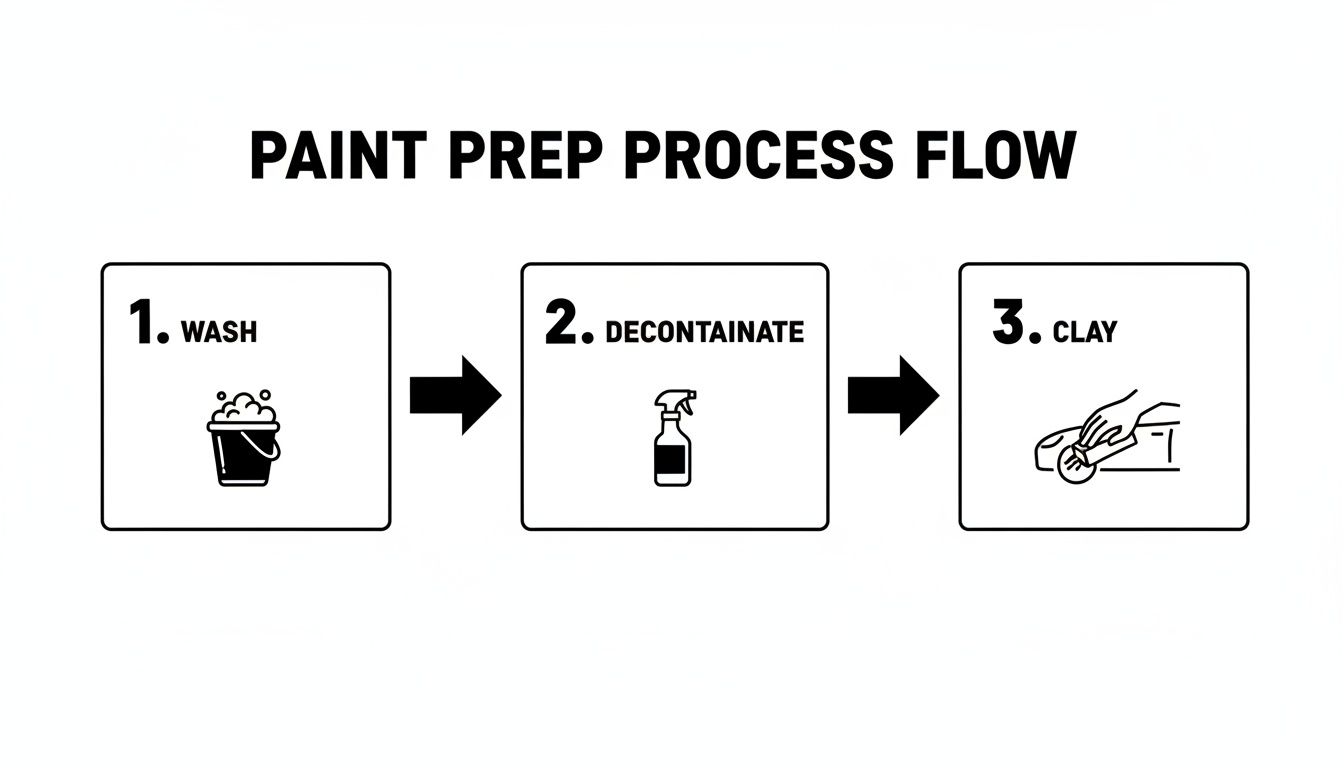
Beyond the Surface: Decontamination
Even after the perfect wash, your paint isn't ready. It might look clean, but it's harboring a hidden enemy. Try this: place your hand inside a thin plastic sandwich bag and gently glide it over a panel like the hood or roof.
Feel that gritty, sandpaper-like texture? Those are bonded contaminants—tiny particles of industrial fallout, rail dust, and stubborn road tar that have actually embedded themselves in your clear coat. Polishing over them is a recipe for disaster. They have to come off first.
Chemical Decontamination: The Iron Meltdown
The first line of attack is chemical. A huge portion of these bonded particles are ferrous (iron-based), shot out from your brake pads and rotors. A dedicated iron remover spray is formulated to dissolve these specific particles on contact, without harming your paint.
You just spray it on the cool, dry paint and wait a few minutes. You'll see it start to "bleed" a dramatic purple color. That's the chemical reaction telling you it's working, breaking down all that embedded iron. A quick, powerful rinse is all it takes to wash it all away.
Physical Decontamination: The Clay Bar Finish
Even after the iron is gone, other non-metallic contaminants will still be stuck to the paint. This is where physical decontamination using a detailing clay bar comes into play. It’s a synthetic, putty-like material that, when paired with a lubricant, glides across the paint and gently pulls any remaining embedded debris out of the clear coat.
Here's how to do it safely:
- Knead the clay into a flat patty and work on a small, 2×2 foot section at a time.
- Liberally spray the panel with a dedicated clay lubricant. You can't use too much; the surface must be slick to prevent the clay from marring the paint.
- With very light pressure, glide the clay back and forth over the lubricated area. You’ll literally feel the surface go from rough to glass-smooth.
- Wipe the lubricant residue away with a clean microfiber towel and move on to the next section, frequently folding the clay to expose a clean surface.
There are also newer tools like clay mitts and towels that achieve the same goal. They are often faster and can be reused even if dropped (after a thorough rinse), making them a great option for beginners.
Clay Bar vs. Clay Mitt: Which Decontamination Tool Is Right for You?
Choosing between a traditional clay bar and a modern clay mitt or towel can be confusing. Both are designed for physical decontamination, but they have key differences in usability, speed, and cost. This table breaks it down to help you pick the best tool for your project.
| Feature | Traditional Clay Bar | Clay Mitt / Towel |
|---|---|---|
| Ease of Use | Requires careful handling and frequent kneading. | Very easy to handle, works just like a wash mitt. |
| Speed | Slower, best for targeted, heavy contamination. | Much faster, covers large areas quickly. |
| Durability | Single-use. Must be thrown away if dropped. | Reusable for many cars. Can be rinsed if dropped. |
| Cost | Lower initial cost per bar. | Higher initial cost, but more economical long-term. |
| Effectiveness | Excellent for pulling out deeply embedded particles. | Great for general contamination, may be less aggressive. |
Ultimately, both tools get the job done. If you're new to this or value speed and convenience, a clay mitt is a fantastic choice. If you're a purist or dealing with exceptionally rough paint, the traditional bar still has its place.
Pro Tip: If you drop a traditional clay bar on the ground, throw it away. Don't even think about reusing it. It will be loaded with grit that will cause deep, severe scratches. It’s a cheap item, and replacing it is far better than ruining your paint.
This step is absolutely critical. For a deeper look into the process, you can learn more about what a clay bar treatment involves and why it’s so important for your paint’s health. Once you’ve washed, chemically decontaminated, and clayed the surface, you finally have a perfectly clean and smooth canvas, ready for the main event: paint correction.
Your Guide to Polishing Away Swirl Marks
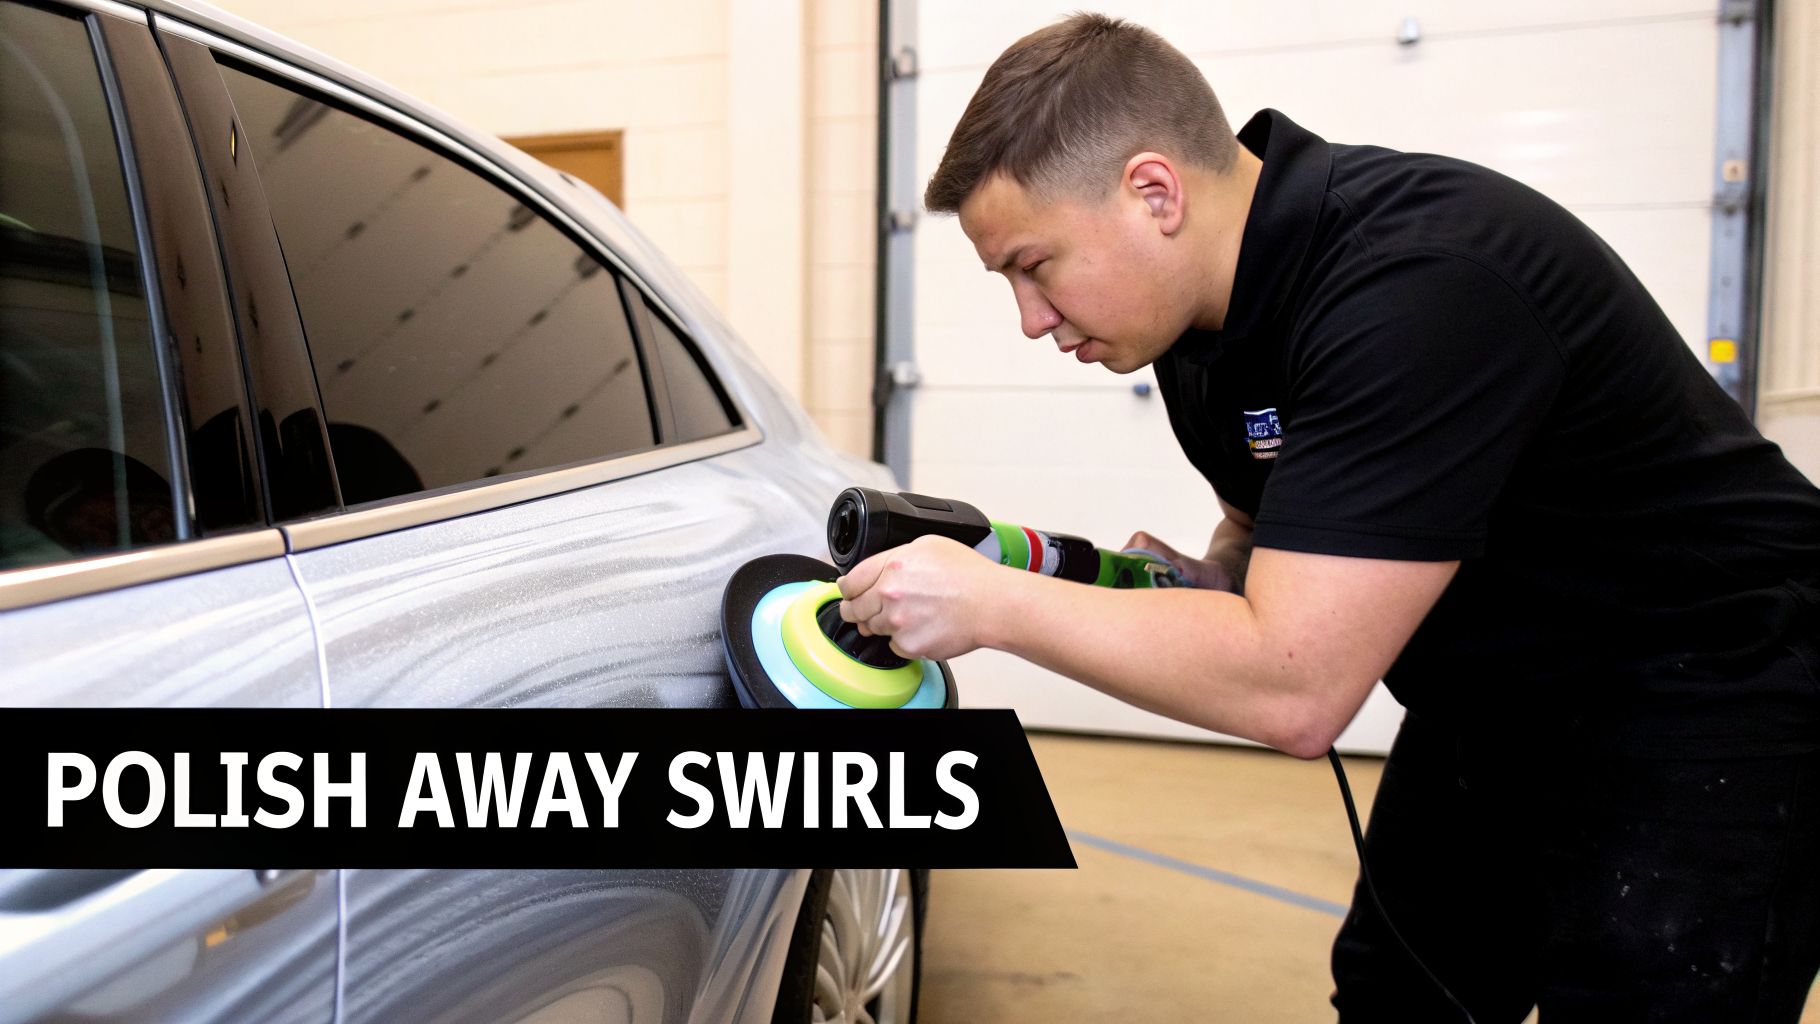
Alright, your car is clean, smooth, and ready for the real transformation. This is where we get to the heart of the matter—physically erasing those scratches and reviving that deep, mirror-like shine your paint is supposed to have.
This process is called paint correction, and it's not about hiding defects with fillers. We're actually removing an incredibly thin, microscopic layer of the clear coat to create a perfectly level surface. It might sound a bit intense, but with a modern dual-action polisher and the right approach, it’s much safer than you’d think.
The whole game comes down to understanding your tools, starting with a test spot, and working patiently panel by panel.
Compounding vs Polishing: What Is The Difference?
People often throw the words "compound" and "polish" around like they're the same thing, but in the detailing world, they have very different jobs. It helps to think of them like sandpaper for your paint. You wouldn't use coarse 80-grit paper for a final finish, right? Same idea here.
Compounding is your heavy-lifting step. A cutting compound uses larger, more aggressive abrasives to slice through the clear coat and level out more serious defects like moderate swirls and light scratches. It does the hard work but often leaves its own super-fine haze or micro-marring in the process.
Polishing is all about refinement. A finishing polish uses tiny, gentle abrasives to clean up the haze left by compounding. This is what truly brings back the clarity, depth, and wet-look gloss. For very minor swirls, you might get away with just polishing, but most paint correction jobs require both steps.
The Test Spot: Your Most Important Step
Before you even think about touching that polisher to your hood, you have to do a test spot. This is a golden rule that every single professional detailer lives by. The mission is to find the least aggressive method possible that still gets you the results you’re after.
Why is this so crucial? Because every car’s paint is different. A Honda might have soft paint that corrects with ease, while a German car like a Volkswagen might have rock-hard clear coat that needs more muscle. A test spot stops you from wasting time with a weak combo or, worse, being too aggressive and removing more clear coat than necessary.
- Pick a small, less-visible area, like the bottom of a door panel.
- Use painter's tape to mark off a 2'x2' square.
- Start with your most gentle combination—a soft foam pad and a finishing polish.
- If the swirls are still there, move up to a medium-cut compound on a firmer pad.
- Once you find the combo that works, that's your winning formula for the rest of the car.
Mastering Your Polishing Technique
With your machine, liquids, and pads chosen, it’s time to get to work. Technique and consistency are everything. Slow, controlled movements will always beat a rushed job.
First, prime your pad. Squeeze out 3-4 pea-sized drops of your compound or polish onto the pad. If the pad is brand new and dry, you can also give it a light mist of a quick detailer spray to help the product spread more easily.
Next, set the polisher to a low speed (like 1 or 2) and dab the product across your 2'x2' section before turning it up. This simple step prevents the liquid from slinging all over you and your garage.
Pro Tip: Never turn your polisher on or off while it’s in the air. Always place the pad flat against the paint before starting and stop it before lifting. This one habit makes a huge difference in keeping product sling under control.
Work the product using a cross-hatch pattern. Move the machine slowly left-to-right, then up-and-down across your section, overlapping each pass by about 50%. This guarantees even coverage and a uniform result. Just apply enough pressure to keep the pad flat and rotating; let the machine and the abrasives do the work for you.
After a few complete passes, grab a clean microfiber towel and wipe the residue away. Check your work with a bright light—the swirls should be gone, replaced by a deep gloss. If you compounded, repeat this whole process with your finishing polish to refine the finish and maximize that shine.
The demand for these flawless results has fueled a booming paint correction industry, which hit a global market value of USD 1.98 billion in 2024. The advanced compounds and polishes that pros rely on use precision-milled abrasives to safely perfect the paint surface. For us at GP Mobile Car Wash & Detail here in Lincoln, these numbers confirm what we see every day: people want their cars to look truly restored. You can learn more about this growing market by checking out research on the paint correction industry.
This methodical approach is your roadmap for how to remove swirl marks from car paint the right way. It’s an incredibly satisfying process that brings your car’s finish back to life, one panel at a time. Just take your time, trust your test spot, and enjoy the amazing results.
Protecting Your Newly Perfected Paint
You've spent hours polishing, and your car's paint finally has that deep, flawless gloss you were after. The swirl marks are gone. But the job isn't quite done. All that hard work needs to be protected.
Think of that freshly polished paint as a naked surface. It's completely exposed. Every wash, every drive, and even just sitting in the driveway exposes it to the very things that caused swirls in the first place. This final step is non-negotiable—it locks in your results and makes future maintenance a whole lot easier.
The right protection comes down to what you value most: durability, looks, or ease of application. Your main options fall into three distinct categories.
Wax vs. Sealant vs. Coating
The world of paint protection has come a long way. What used to be a simple choice between a natural carnauba wax and a synthetic sealant now includes super-advanced ceramic coatings that can protect your finish for years.
Here’s a quick breakdown of your choices:
- Traditional Carnauba Wax: A favorite among enthusiasts for the deep, warm glow it provides. Waxes look beautiful, but they're the least durable option, usually lasting just a few weeks to a couple of months.
- Synthetic Paint Sealant: These are lab-engineered polymers built for longevity. A sealant gives your paint a sharp, glassy shine and lasts anywhere from four to six months, making it a great middle-of-the-road choice.
- Ceramic Coatings: This is the top tier of modern paint protection. A ceramic coating is a liquid polymer that forms a chemical bond with your paint's clear coat. It creates a hard, sacrificial layer that can last for years.
For anyone who has just put in the effort to remove swirl marks, the real goal should be long-term prevention. While wax is great for a weekend show car, a quality sealant or a ceramic coating delivers the tough, daily-driver protection you actually need.
Choosing the Right Protection for Your Lifestyle
Your decision should be based entirely on your goals. Do you enjoy the ritual of waxing your car every month, or would you rather have a "set it and forget it" solution?
Carnauba waxes are perfect for the weekend hobbyist who finds the detailing process therapeutic. Paint sealants are a fantastic and cost-effective step up, giving you much better durability than wax without the more involved application of a true coating.
Ceramic coatings, which we offer as a professional service at GP Mobile Car Wash & Detail, are the ultimate investment in your vehicle's appearance. They provide unmatched resistance to chemicals, harsh UV rays, and light scratches, making it significantly harder for new swirl marks to appear. Their incredible hydrophobic properties also mean your car stays cleaner for longer and is a breeze to wash. Of course, proper washing is still crucial, and our guide on the best way to wash a car without scratching will help you keep that finish perfect.
With the growing popularity of quality used cars, preserving paint has become more important than ever. These vehicles often need more attention to bring them back to life, making durable protection a smart move for owners everywhere, from here in Lincoln, Nebraska, to across the globe. You can learn more about these shifts in the latest car care products market report. Protecting your newly corrected paint is the only way to make sure your hard work lasts.
Common Questions on Removing Swirl Marks
Even after diving deep into the process, a few practical questions always pop up. We get them all the time. Let’s tackle the most common concerns people have before they start trying to remove swirl marks, giving you the confidence to get the job done right.
How Much Time Should I Set Aside for This Project?
This is the big one, and the only honest answer is: it depends. If you're a beginner tackling a full wash, decontamination, and a two-step paint correction on a mid-sized sedan, you should probably block out your entire weekend.
- Small Car (e.g., Mazda Miata): 6-8 hours
- Mid-Size Sedan (e.g., Honda Accord): 8-12 hours
- Large SUV (e.g., Chevy Tahoe): 12-16+ hours
Patience is your best friend here. Rushing the job is the fastest way to get disappointing results. I often tell people to split the work over two days—it helps you stay focused and avoid the fatigue that leads to mistakes.
Can Polishing Actually Damage My Clear Coat?
Yes, it absolutely can, but it’s highly unlikely if you’re careful and use the right tools. Your car’s clear coat is incredibly thin, roughly the thickness of a Post-it note. Every time you compound or polish, you are physically removing a microscopic layer to level the surface.
The real danger lies in being too aggressive. Firing up a powerful rotary buffer with no experience, holding the machine in one spot for too long, or using a heavy-cut compound when a light polish would do—that’s how you burn right through the clear coat. This is exactly why we always recommend a dual-action (DA) polisher and starting with a test spot.
With a modern DA polisher, the risk is minimal. These machines are designed to be safe for enthusiasts while still delivering fantastic defect removal. As long as you keep the polisher moving and stick to the least aggressive pad and polish combination that gets the job done, you'll be improving your paint, not harming it.
What Is the Best Way to Maintain a Swirl-Free Finish?
After pouring all that time and effort into making your paint perfect, the last thing you want is for those ugly swirls to return. Preventing them comes down to one thing: safe washing habits. The single biggest cause of swirl marks is improper washing and drying techniques.
- Stick to the Two-Bucket Method: This isn't optional. One bucket for your soapy water, and a separate one for rinsing your wash mitt. It's the foundation of a safe wash.
- Use Quality Microfiber: Ditch the old bath towels, chamois, or stiff brushes. Invest in plush, high-quality microfiber wash mitts and dedicated drying towels.
- Add Protection: A durable paint sealant or, even better, a ceramic coating acts as a sacrificial barrier. It takes the scratches and abuse so your clear coat doesn't have to.
- Never Dry-Wipe: Wiping a dusty car with a dry towel is like taking sandpaper to your finish. If it's dusty, give it a proper rinse or use a quality waterless wash solution with a clean microfiber towel.
Of course, swirls aren't the only thing that can mar your finish. Dealing with other common issues like mineral deposits is also part of proper maintenance. You can learn more by checking out our guide on how to remove water spots from car paint for more specific advice.
While doing it yourself is incredibly rewarding, sometimes you just need guaranteed, professional results without giving up your weekend. At GP Mobile Car Wash & Detail, we specialize in expert paint correction that can restore your car's finish to a condition that’s often better than new. From a light polish to a full multi-step correction and ceramic coating, book our mobile service in Lincoln, NE, at https://www.gpmobilecarwash.com.