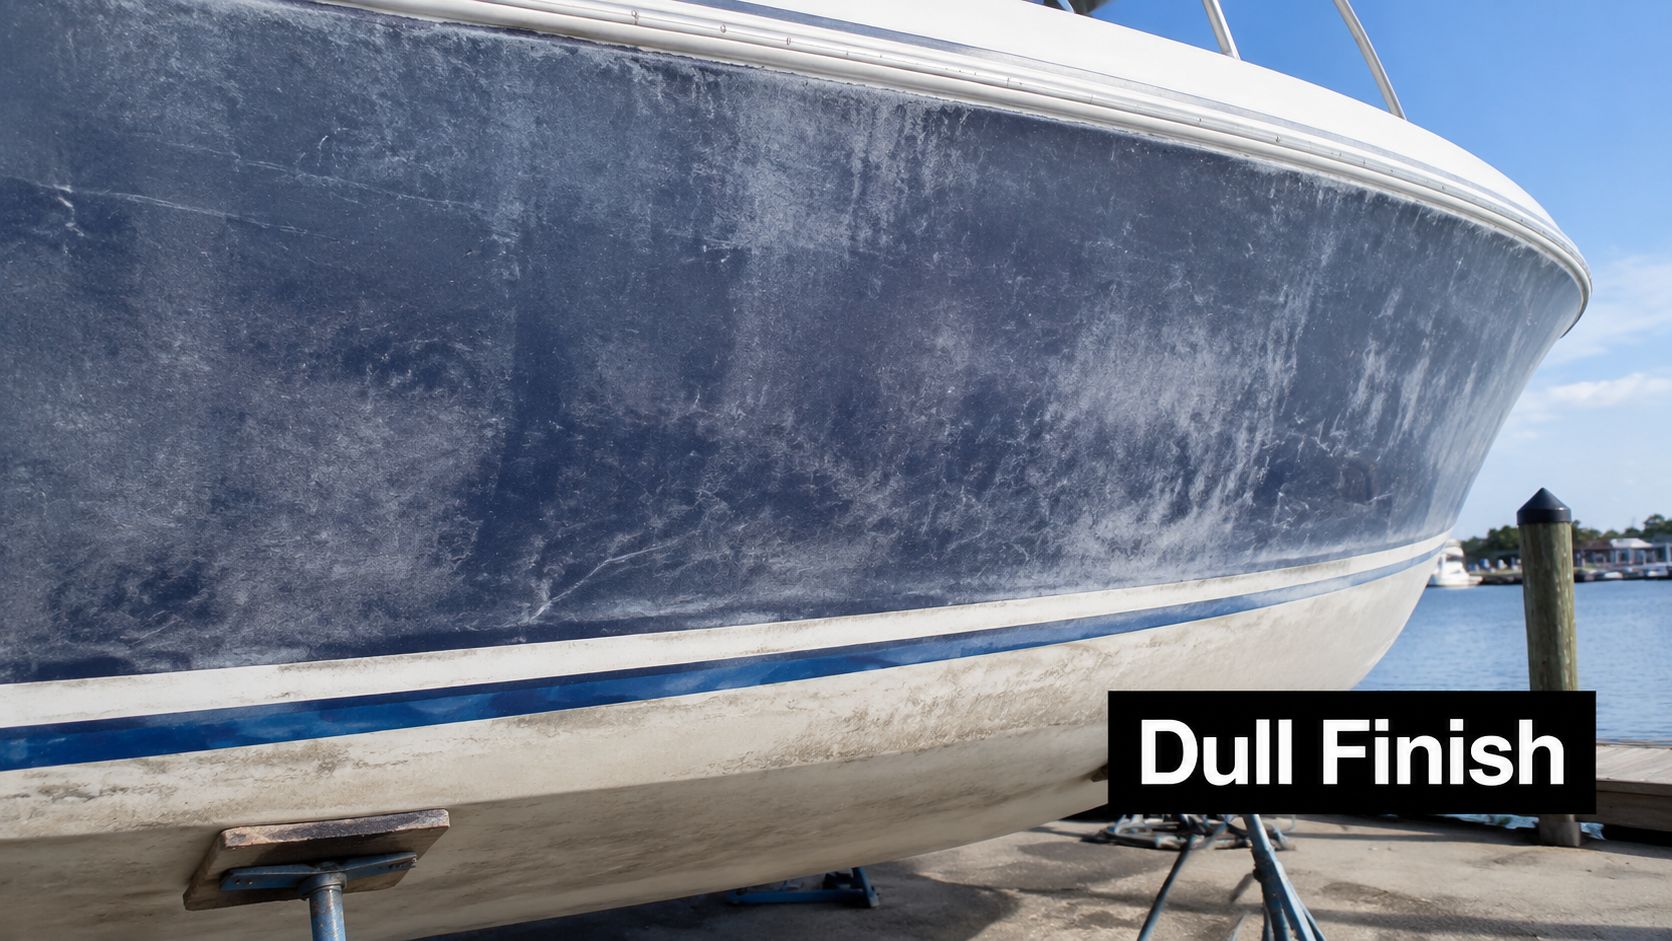
Your boat probably didn't look bad all at once. It usually happens slowly. The color loses depth, the shine goes flat, and one day the hull looks tired no matter how recently you washed it.
That's when most owners make the same mistake. They assume every dull finish needs the same fix. It doesn't. Some boats need nothing more than careful compounding, polishing, and protection. Others have scratches, chips, or cracks that won't improve with more buffing. If you choose the wrong path, you can waste a weekend, remove more material than necessary, and still end up staring at damage that's still there.
Boat gel coat restoration starts with diagnosis, not product choice. Gelcoat is the outer surface layer that protects the fiberglass underneath, and once sun, saltwater, and neglect take their toll, you need to decide whether you're dealing with faded gelcoat or failed gelcoat. That distinction saves money and prevents unnecessary sanding.
Is Your Boat's Finish Faded or Failing
A dull hull can fool you. From ten feet away, oxidation, old wax buildup, and actual surface damage can all look like the same washed-out haze. Up close, they behave very differently.
What gelcoat is actually doing
Gelcoat isn't just there to make the boat shiny. It's the visible outer layer over fiberglass, and it takes the abuse first. Sun exposure, salt, moisture, and poor upkeep attack that surface long before you notice major failure.
When that top layer oxidizes, the finish starts looking chalky and flat. If the problem stays at the surface, restoration is usually straightforward. If the surface is cracked, chipped, or worn through, the job changes from polishing to repair.
Practical rule: If the finish looks bad but still feels intact, start by suspecting oxidation. If the surface is broken, missing, or split, treat it like a repair problem first.
A lot of owners clean the boat, grab a heavy compound, and hope the gloss returns. Sometimes that works. Sometimes it makes a shallow issue needlessly aggressive. That's one reason common advice around washing and protection can be misleading, especially if it skips the condition check. Some of the same bad assumptions show up in general boat care myths, which is why it helps to separate appearance problems from material failure before you start. This breakdown of boat cleaning myths and what really matters gets at that bigger maintenance problem.
The first decision that matters
Use this quick filter before you pick up a machine:
- Looks chalky but not broken: Usually points to oxidation or fading.
- Feels rough, pitted, or uneven: May still be oxidation, but it needs closer inspection.
- Shows chips, star cracks, or open scratches: That's repair territory.
- Leaves you unsure after washing: Stop there and inspect in bright light before cutting the surface.
Boat gel coat restoration goes better when you slow down at the start. The goal isn't just to make the hull shiny again. The goal is to remove only what needs removing, repair what needs filling, and leave enough healthy gelcoat in place to protect the boat for the long haul.
Assessing Gel Coat Damage Like a Pro
Most failed DIY jobs start with a bad read on the damage. Owners either polish defects that need repair, or they sand into gelcoat that only needed oxidation removal.
As Sea Tow's gelcoat repair guidance points out, the primary challenge is knowing when to stop at oxidation removal and when to escalate to true gelcoat repair. That matters because aggressive work on only-oxidized gelcoat creates unnecessary sanding risk, while under-treating a true crack can allow water intrusion to continue.
Start with clean, dry, bright conditions
Don't inspect a dirty hull. Salt haze, road dust, hard water spotting, and old product residue all hide defects.
Wash the surface thoroughly and let it dry. Then inspect it in direct daylight or under a strong inspection light. Move your head around the panel. Gelcoat tells the truth from an angle.
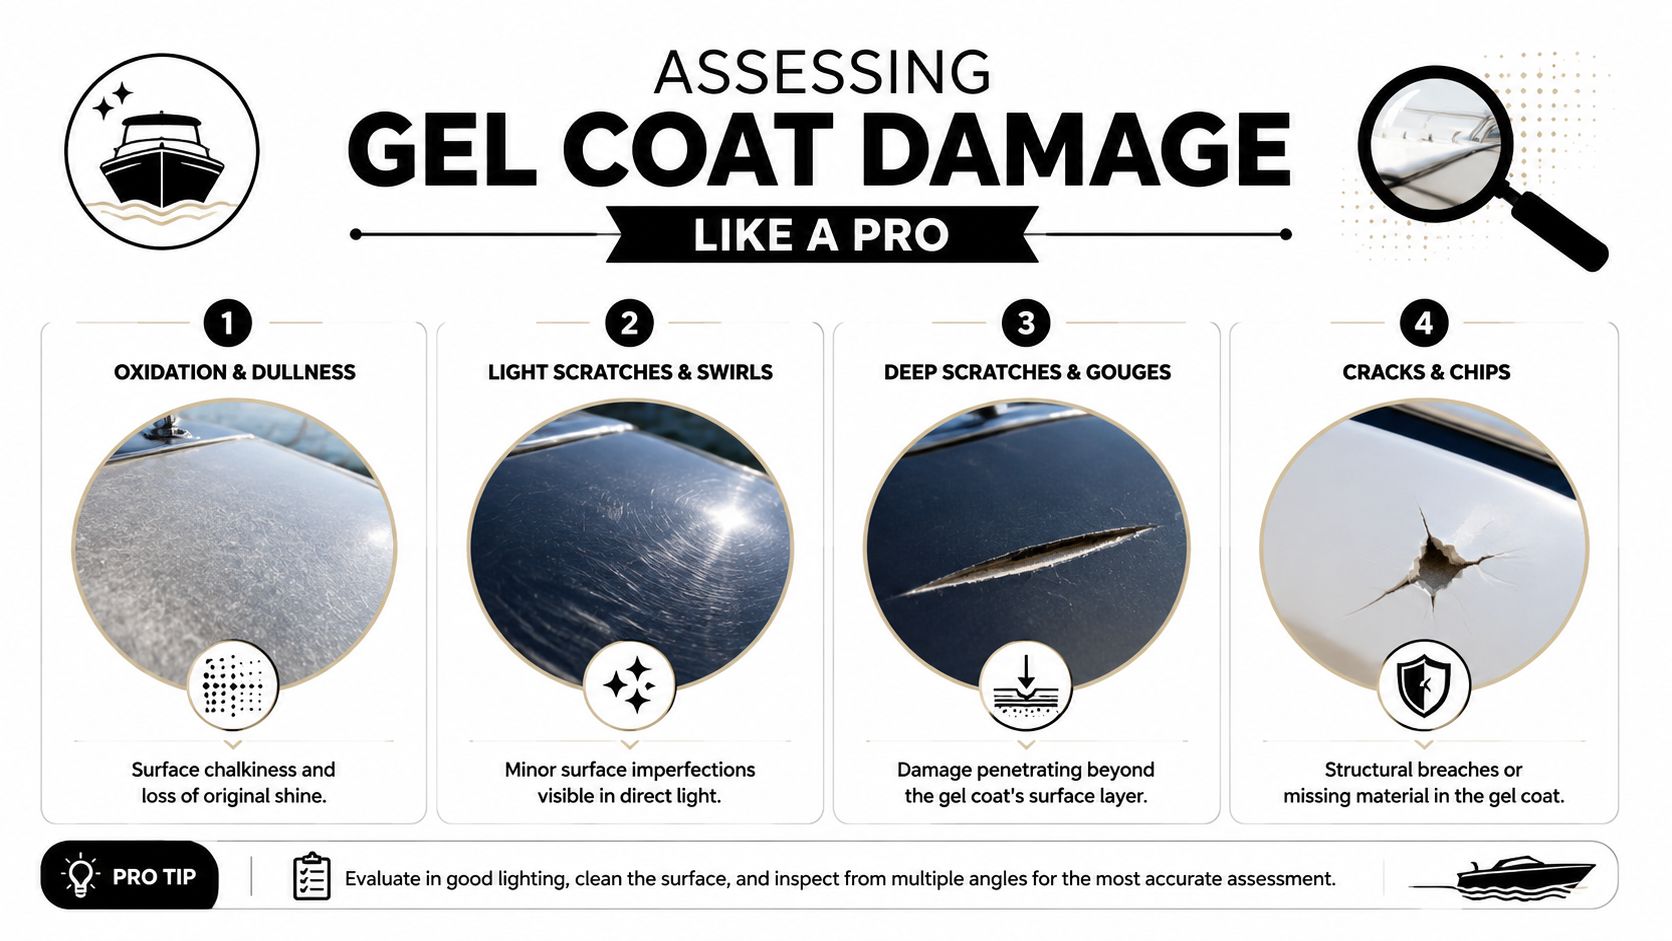
Four damage types that need different responses
Here's the framework I use when deciding how to approach boat gel coat restoration:
| Damage type | What it looks like | What it feels like | Usual path |
|---|---|---|---|
| Oxidation | Dull, hazy, chalky finish | Powdery or slightly dry | Compound, polish, protect |
| Light scratches and swirls | Fine marks in reflected light | Mostly smooth | Polish or light compounding |
| Deep scratches and gouges | Obvious lines or missing material | Catches your nail | Localized repair |
| Cracks and chips | Splits, star patterns, broken edges | Uneven or sharp | Repair first, then finish |
Use the fingertip and fingernail tests
A quick tactile inspection tells you more than a photo ever will.
- Powder on your fingers: That usually points to oxidation. Rub a dry fingertip across the area. If you pick up chalky residue, the surface layer is degrading.
- Fingernail catches lightly: You may have a scratch that can improve with correction, but test a small spot before assuming.
- Fingernail catches hard: Treat it as a deeper defect. Compounding may improve the edges, but it won't remove damage that has broken the surface.
- Sharp edge around the defect: That's often a chip or gouge, not a polish issue.
If your fingernail drops into the damage, don't expect compound to make it disappear. Compound removes oxidation and refines the surface. It doesn't replace missing gelcoat.
Know the difference between cosmetic and serious cracking
Spider cracks are common around stress points, hardware, corners, and impact areas. Some are cosmetic. Some are warning signs.
Look for these clues:
- Hairline surface crazing: Fine shallow lines in the finish may stay in the gelcoat layer.
- Cracks with movement nearby: If the area flexes, the problem may be deeper than the surface.
- Darkness inside the crack or chipped edges: That can indicate the crack has opened enough to hold contamination or moisture.
- Clusters near hardware or impact zones: Those deserve more caution than isolated hairlines in low-stress areas.
When to stop diagnosing and call it repair
Boat gel coat restoration stays in polish territory only if the gelcoat is still continuous. Once material is missing, split, or clearly breached, you're into repair work.
Use this decision shortcut:
- Wash and dry the area.
- Check for chalky residue and overall dullness.
- Run your fingernail across every defect.
- Look for open cracks, chips, or missing material.
- If the surface is intact, restore it. If the surface is broken, repair it.
That one decision prevents a lot of wasted effort.
Restoring Minor Oxidation and Surface Fading
If your inspection shows minor to moderate oxidation and the surface is still intact, this is the part of boat gel coat restoration that gives the biggest visual payoff. The process is simple on paper and labor-intensive in real life.
According to West Marine's gelcoat care guidance, the standard workflow is to wash first, then use a rubbing compound or cleaner wax to remove oxidation, follow with a marine polish to refine gloss, and finish with a UV-protective wax or sealant. West Marine also recommends working in small areas and avoiding wax application in direct sunlight.
The three-step process that actually works
Don't try to shortcut this into a one-product miracle fix. The cleanest results usually come from three separate jobs.
Wash the hull first
Remove salt, dirt, and film so your pad isn't grinding contamination into the gelcoat.Compound to remove oxidation
This is the cutting stage. You're removing the dead, faded surface layer.Polish to improve clarity
Compounding restores color and cuts oxidation, but it often leaves the finish less refined than you want.Seal the result
If you stop after polishing, the boat looks better but stays vulnerable.
Machine technique matters more than brand names
A rotary polisher has the cut to tackle oxidized gelcoat efficiently, but it also creates heat fast. A dual-action machine can be safer for lighter correction and finishing, especially for owners who don't have much machine experience.
One of the most useful practical benchmarks comes from Better Boat's restoration guide, which recommends working in 2-foot by 2-foot sections and running a rotary around 1,200 to 1,500 RPM. That range gives you enough correction without building heat too aggressively.
Use that advice with discipline:
- Keep sections small: Large passes create uneven correction.
- Keep the pad moving: Staying in one place too long can overheat the gelcoat.
- Clean pads often: A loaded pad cuts poorly and smears oxidation residue.
- Inspect after each section: Don't do the whole side before checking whether your process is working.
Shop-floor habit: Do one test spot first. If your first combination restores color and gloss without excessive haze, keep going. If it doesn't, adjust before you commit to the whole hull.
A practical tool list
For oxidation and fading, a basic setup usually includes:
- Rotary or dual-action polisher: Choose based on your skill and the severity of the oxidation.
- Cutting pad and finishing pad: Keep separate pads for compound and polish.
- Marine rubbing compound: This handles the oxidation-removal stage.
- Marine polish: For gloss refinement after the cut.
- Wax or sealant: For UV protection.
- Microfiber towels: Use clean towels for wipe-downs and inspection.
- Masking tape: Protect edges, graphics, and fittings.
There's a lot of overlap here with paint correction discipline on vehicles. The surfaces are different, but the idea of stepping up only as needed, managing heat, and refining after the cut is the same. If you want a simple analogy, this overview of how to restore faded car paint mirrors the same correction mindset.
What doesn't work well
A few common mistakes keep owners from getting a clean result:
- Going straight to wax: Wax can gloss over oxidation briefly, but it won't remove it.
- Using huge amounts of product: More product usually means more mess, not more correction.
- Working in direct sun: Products flash too fast and the surface runs hotter.
- Skipping polish after compound: You'll often leave the finish flatter and hazier than necessary.
If the hull improves quickly during your test spot, you're in the right lane. If the chalkiness remains, the surface stays blotchy, or deeper marks stand out once the oxidation is gone, the job has probably crossed into repair territory.
Tackling Deeper Scratches Gouges and Cracks
Once the surface is broken, polishing stops being the answer. Compounds can soften the appearance of damage around the edges, but they won't fill missing material, close an open crack, or rebuild thickness where gelcoat is gone.
This is the point where boat gel coat restoration becomes localized gelcoat repair.
The benchmark repair sequence
A useful technical standard comes from Durabak's gelcoat repair guide. Their process calls for preparing the repair area with 360-grit, then building the repair in 5 to 6 coats to reach about 15 to 20 mil film thickness, allowing about 20 minutes between coats for solvent flash-off. After curing with PVA, the repair is wet-sanded progressively through 320, 600, and 1,000 grit before buffing.
Those numbers matter because most ugly repairs fail in one of three ways. The repair is too thin, the sanding is rushed, or the final edge isn't blended properly.
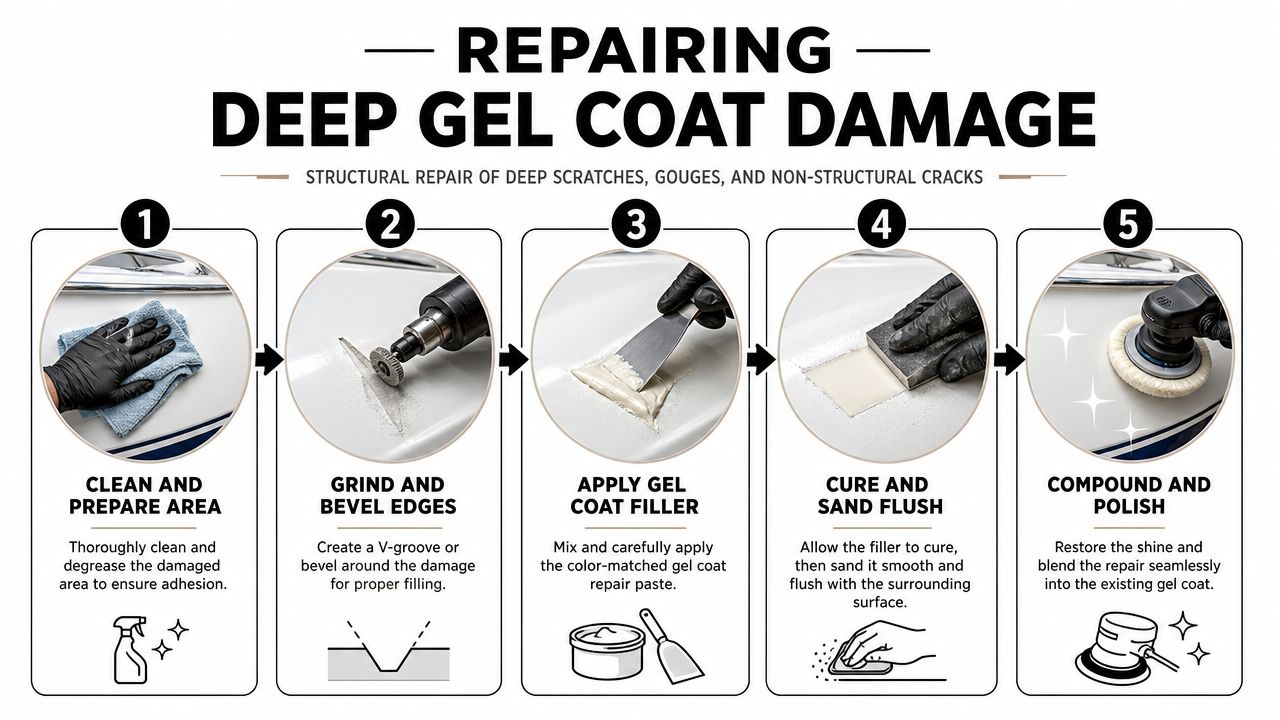
How to approach a localized repair
A clean repair usually follows this order:
Clean the area thoroughly
Remove wax, dirt, oxidation residue, and anything that could interfere with adhesion.Open and prepare the defect
Chips, gouges, and some cracks need the edges cleaned up so fresh material has something sound to bond to.Sand the repair zone with 360-grit
That creates the mechanical bite for the new gelcoat.Apply gelcoat in multiple thin coats
Building thickness gradually is safer than trying to fill the damage in one heavy application.Allow proper flash time between coats
Rushing this stage traps problems into the repair.Cure fully, then wet-sand in sequence
Sanding through 320, 600, and 1,000 grit levels the repair and refines the edge for buffing.Compound and polish the repaired spot
This restores gloss and blends the repair into the surrounding gelcoat.
Where DIY repairs usually go wrong
The most common DIY mistake isn't color match. It's impatience.
- Too much material at once: Heavy application can cure unevenly and distort the patch.
- Skipping grit steps: Jumping straight to finer paper leaves edges that still telegraph through the finish.
- Buffing too aggressively: Excess heat can create trouble after all the hard prep work.
- Repairing without proper prep: Contamination under the patch often shows up later, not immediately.
A repair doesn't become invisible because you buffed it hard enough. It disappears because the thickness, cure, leveling, and edge blend were all handled correctly.
Which cracks are reasonable to repair yourself
Some defects are fair DIY candidates. Some aren't.
| Damage | DIY possible | Notes |
|---|---|---|
| Small chip | Usually, if you can prep and level it carefully | Best for patient hands |
| Shallow gouge | Sometimes | Depends on shape, access, and color match |
| Hairline gelcoat crack | Sometimes | Only if it's clearly non-structural |
| Stress crack near hardware | Better left for deeper inspection | May indicate movement underneath |
| Wide, active, or spreading crack | No | Needs diagnosis before cosmetic repair |
If you're repairing a colored hull, expectations need to stay realistic. White repairs are often more forgiving. Dark colors and metallic tones show edge lines, texture differences, and slight color mismatch much faster.
When repair turns into professional territory
Stop the DIY route if any of these show up:
- The crack seems tied to flex or impact damage.
- The area is large enough that feathering and color matching will be difficult.
- There are multiple defects close together.
- You can't tell whether the damage is only in the gelcoat.
- The hull finish is dark enough that a slightly off repair will bother you every time you see it.
Good gelcoat repair is slower than most owners expect. The sanding sequence alone tells you why. If you skip the progression, you may still have a filled defect, but you'll also have a visible repair edge that catches your eye every time light hits the panel.
Applying Long-Term Protection and Maintenance
Restoration isn't finished when the shine comes back. It's finished when the surface is protected well enough that you don't have to repeat heavy correction sooner than necessary.
That's where many owners make the second big mistake. They spend the effort on boat gel coat restoration, then protect it with whatever is on the shelf without thinking about labor over a full season.
Wax, sealant, or ceramic coating
The key comparison isn't just gloss. It's how much time and repeat work each option demands.
As Yachting's restoration article notes, many owners focus on the initial shine but miss the trade-off between traditional wax, which may need reapplication every few weeks, and modern marine ceramic coatings, which offer longer-term defense. The better choice depends on total cost and labor per season, not just the sticker price.
Here's the practical way to approach this:
| Protection type | Strengths | Limitations | Best fit |
|---|---|---|---|
| Wax | Easy shine, familiar application | More frequent upkeep | Owners who don't mind regular reapplication |
| Sealant | Better staying power than old-school wax routines | Still needs maintenance | Owners wanting a balance of ease and durability |
| Marine ceramic coating | Stronger long-term defense and easier wash maintenance | Higher upfront effort and cost | Owners keeping the boat in harsh exposure or wanting less repeat labor |
What works in the real world
If the boat lives in harsh sun, sees regular water exposure, and sits uncovered, protection strategy matters as much as correction quality. A beautifully restored hull can start giving back gloss fast if it goes right back into UV with weak protection.
Use this decision guide:
- Choose wax if you enjoy frequent hands-on upkeep and want a simple, familiar finish product.
- Choose a sealant if you want better durability without changing your maintenance routine too drastically.
- Choose ceramic coating if you want to reduce recurring labor and put your money into longer-term defense.
This is also why routine service matters after restoration. Washing off salt and keeping a protective layer current is cheaper and easier than repeated heavy correction. For owners comparing maintenance options, a dedicated boat wash and wax service sits in that middle ground between full correction and total neglect.
The best protection product is the one you'll actually maintain. A premium coating with no upkeep still loses ground. A simpler protection plan done consistently often beats a better product used once and forgotten.
A simple maintenance mindset
Keep the restored finish alive with basic habits:
- Wash before buildup hardens: Salt and grime get more stubborn the longer they sit.
- Refresh protection on schedule: Don't wait until the hull looks flat again.
- Address chips and cracks early: Protection products don't solve broken gelcoat.
- Store smarter when possible: Shade and covers reduce how hard UV works on the surface.
Long-term appearance is mostly discipline. The restoration stage gets the attention. The maintenance stage decides how long that work lasts.
DIY vs Professional Restoration When to Call for Help
DIY boat gel coat restoration makes sense in the right situation. It's a reasonable project when the oxidation is light, the boat is small enough to manage, and the finish doesn't need actual repair. You can get very good results if you work patiently, use the least aggressive method that works, and stop as soon as the surface tells you to stop.
The problem is that many boats are already past the easy stage by the time owners decide to act. Severe oxidation can push a job into wet sanding, multi-stage compounding, and a long correction cycle. One marine-service source estimates that major restoration from oxidation damage can cost $4,000 to $10,000+ when extensive correction is required, according to Mobile Boat Guys' overview of gelcoat restoration costs. That's the economics of neglect in plain terms.
DIY is smart when the job is controlled
A do-it-yourself approach usually fits when:
- The problem is only surface dullness: No chips, open cracks, or gouges.
- You can do a small test section first: That tells you whether the hull responds well to compounding.
- You already have some machine-polishing discipline: Heat control matters on gelcoat.
- You're comfortable with an imperfect first attempt: Learning takes time.
Professional help is smarter when the stakes go up
Call for help when the job includes broad oxidation, multiple defects, dark-colored gelcoat, or any damage that might be more than cosmetic.
Professionals bring more than tools. They bring judgment. That matters when deciding how aggressive to go, how much material to remove, whether a crack should be repaired or investigated, and how to finish the surface so it stays consistent across the whole boat.
Here's the candid version. If you're wondering whether you should wet sand, mix repair gelcoat, or chase cracks with trial and error, you're already near the point where experience pays for itself.
Some jobs need elbow grease. Others need restraint. The hard part is knowing which one you're looking at before the first pass with the machine.
For boat owners in Lincoln, NE, and surrounding areas, a professional inspection can save a lot of wasted effort. It can also keep a manageable restoration from turning into a costly repair.
If your boat's finish is faded, chalky, scratched, or showing signs of deeper gelcoat damage, GP Mobile Car Wash & Detail can help you choose the right path from the start. The team serves Lincoln, Nebraska and surrounding areas with professional boat detailing, gelcoat restoration, compounding, polishing, and long-term protection options, including ceramic coating. Whether your boat needs a light correction or a full assessment before repair work, contact GP Mobile Car Wash & Detail for a professional evaluation and bring the finish back the right way.